How to Remove Subtitles From Video: Proven Methods That Work
When You Actually Need To Remove Subtitles From Video
Deciding to remove subtitles from video usually comes from a specific, practical need. It's not just about how the video looks; it's about making your content effective for its intended purpose. Figuring out why you need to do this is the first step. It helps you set quality standards and decide how much time and effort the task really deserves.
Scenarios Demanding a Clean Slate
Let's walk through a few common situations where removing subtitles becomes a top priority. You might see your own project in one of these real-world examples:
- Repurposing and Localization: Imagine you’re a marketing manager who just got a library of awesome promotional videos from a European branch. The catch? They all have hardcoded German subtitles. To use them for a North American campaign, you need a clean version to add new, English-language graphics and captions.
- Correcting Inaccurate AI Captions: You used an auto-generator to add captions to a technical tutorial. But after watching it, you realize the AI completely botched key terms, creating instructions that are confusing or just plain wrong. Removing these burned-in, faulty subtitles is critical before you can replace them with accurate ones.
- Brand Compliance and Aesthetics: A corporate client gives you a video for a big presentation, but it’s plastered with distracting, brightly colored open captions that clash with their strict brand guidelines. The goal is to present a clean, professional video that fits the company's look, which means the existing text has to go.
- Creating Video B-Roll: You might want to use a clip from an existing video as background footage (B-roll) in a new project. The original subtitles would be distracting and out of place in this new context, so you need to remove them to create a clean visual asset.
The Business Case for Subtitle Management
These scenarios point to a growing need in the world of content creation. The global demand for video has also expanded the captioning and subtitling market, leading to advanced tools for both adding and removing text. With more than half of companies planning to increase their video marketing budgets, being able to manage subtitles is no longer a niche skill but a key competency for content managers. This market growth shows just how important it is for businesses to adapt videos for different regions and standards, which often involves the need to remove subtitles from video files to make way for new, localized versions. Your specific reason for removal will guide every choice you make from here on out.
Identifying What Type of Subtitles You're Working With
Before you jump into removing subtitles from a video, you need to do a little detective work. The right removal method completely depends on the type of subtitles you're dealing with. Getting this step right from the start will save you a ton of time and prevent a major headache later on. Think of it as a doctor diagnosing an illness before writing a prescription—you have to know what you're up against.
You'll generally run into two types: soft subtitles and hardcoded subtitles. Each one demands a completely different approach.
Soft Subtitles (The Easy Win)
If you have soft subtitles (often called "softsubs"), you're in luck. This is the best-case scenario. Softsubs are basically a separate text file or data stream that gets layered on top of your video while it's playing. They aren't actually part of the video image itself, which means they can usually be turned on and off.
So, how do you know if you've hit the jackpot with softsubs? It's pretty straightforward:
- Try the "CC" Button: Open your video in a media player like VLC or even the default player on your computer. Hunt for a button labeled "Subtitles," "Captions," or "CC" in the menu. If you can click it and watch the subtitles vanish, you've got soft subtitles.
- Inspect the File Container: Sometimes, these subtitle tracks are neatly tucked inside the video file itself (common with MKV or MP4 files). If you look at the file's properties or media info within a player like VLC, you'll see these extra "tracks" listed right alongside the main video and audio streams.
Hardcoded Subtitles (The Real Challenge)
This is where things get a bit more involved. Hardcoded subtitles (also known as "hardsubs" or "open captions") are permanently burned into the video frames. They’ve become part of the actual image, just like the people, backgrounds, and everything else on screen. You can't just toggle them off with a button because, as far as the video file is concerned, they're not text—they're just pixels.
You'll know you're facing hardcoded subtitles if:
- The "CC" button trick doesn't work, and the text stubbornly stays on the screen.
- The subtitles are still there when you upload the video to a platform that doesn't support the original subtitle format.
- You can't find any option to disable them in any media player you try.
To figure out which type of subtitles you have and how to tackle them, it helps to see the big picture. Here’s a quick breakdown of the different subtitle types you might encounter.
Subtitle Types and Removal Difficulty
Comparison of different subtitle formats and their removal complexity
| Subtitle Type | Removal Difficulty | Best Method | Time Required |
|---|---|---|---|
| Soft Subtitles | Easy | Toggling off in a media player or removing the track. | Seconds |
| Hardcoded Subtitles | Hard | AI-powered removal tools like SnapCaptionRemover. | Minutes to hours, depending on video length. |
| Embedded Subtitles | Moderate | Remuxing the video file to remove the subtitle track. | A few minutes |
As you can see, soft subtitles are a quick fix, but hardcoded ones require a more powerful tool. Understanding this distinction is the key to picking the right strategy and avoiding wasted effort.
Why go to all this trouble? The data is pretty clear: cleaning up videos, including getting rid of unwanted subtitles, has a real impact on how people watch and engage with your content.
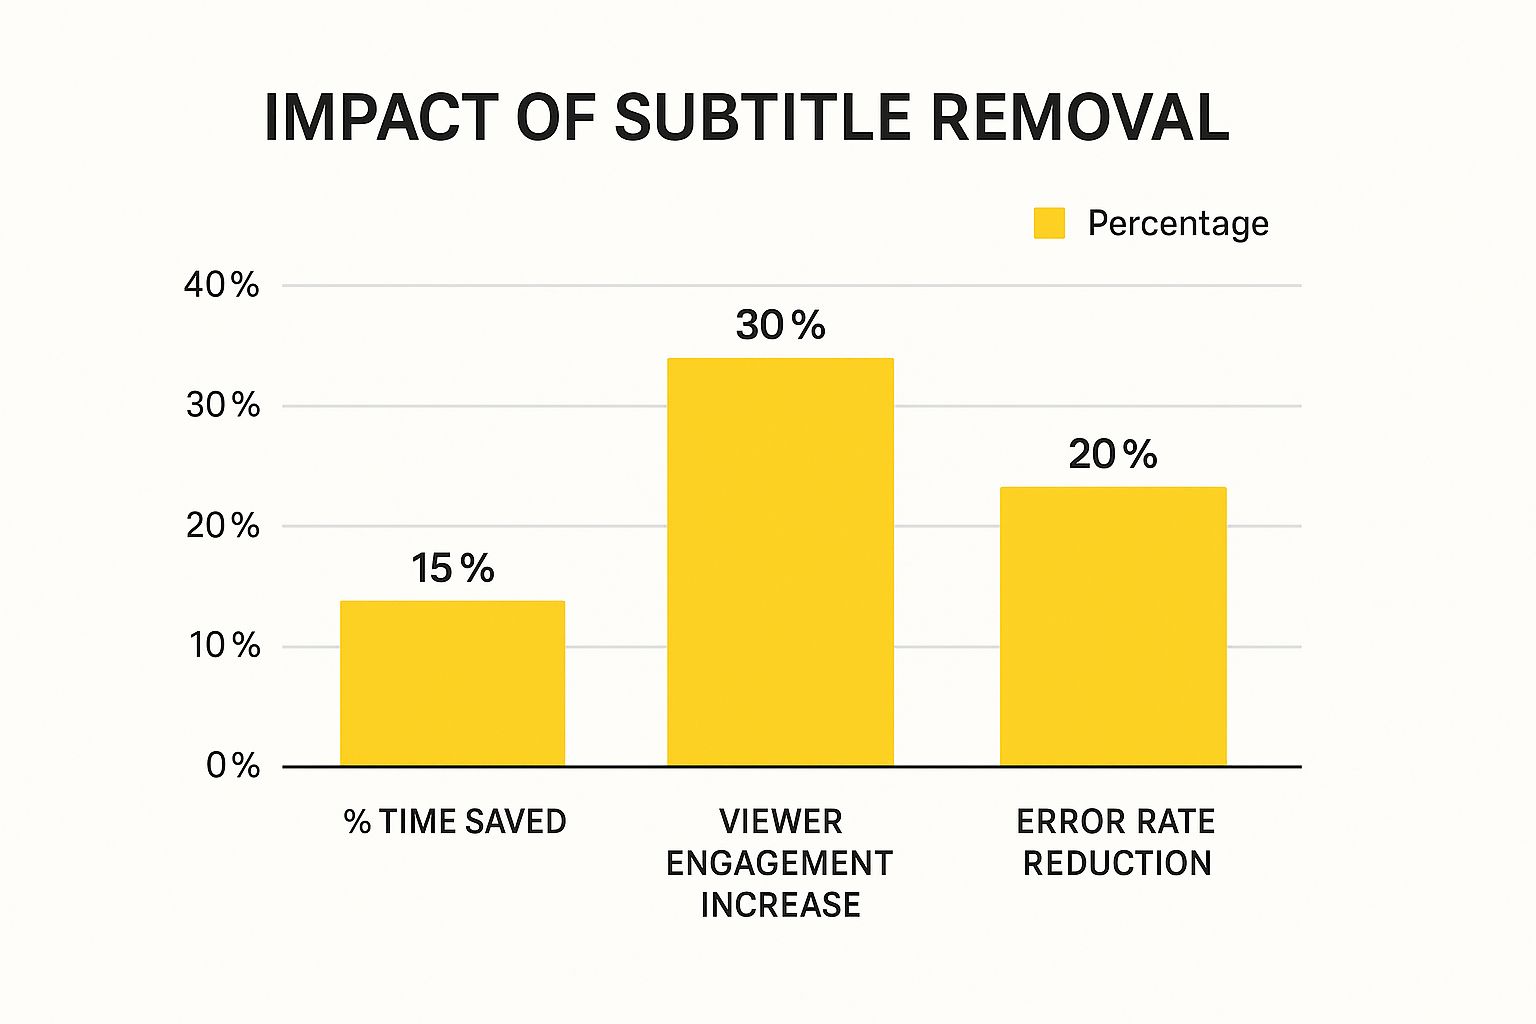
The takeaway here is simple: a cleaner video not only makes your production process more efficient but also significantly improves your audience's experience. Knowing whether your subtitles are soft or hardcoded is your first step toward achieving that cleaner, more professional final cut.
Handling Soft Subtitles Like a Pro
If you've checked your video and found it has soft subtitles, breathe a sigh of relief. This is the best-case scenario. Soft subtitles are just a separate text layer that plays over the video, not something permanently burned into the picture. This makes the job to remove subtitles from video files much cleaner and doesn't harm your original footage.
Think of it like peeling a sticker off a window—the text is a distinct element you can lift away without leaving a mark. It’s far simpler than dealing with hardcoded text, which is a whole different challenge. You can learn more about in our detailed guide on removing text from video.
Quick Fixes With Your Media Player
For a quick, temporary fix on your own computer, your media player is often all you need. Most popular players, like the versatile VLC Media Player, are designed to manage different data tracks within a single video file.
- Toggling Tracks On and Off: Just open your video in VLC, go to the "Subtitle" menu, and choose "Disable" or select a different "Sub Track." If the text vanishes, you've confirmed they are soft subtitles. This is great for your own viewing but doesn't save a new version of the video without them.
- Inspecting Streams: To be absolutely sure, you can look at the "Codec Information" or "Media Information" panel. This technical view shows you every individual track in the file: video, audio, and—if present—subtitles. Seeing a subtitle track listed here is definitive proof.
Creating a Permanently Clean File
When you need to share the video or use it in another project without the text, simply turning off the subtitles won't cut it. You'll need a new file that completely excludes the subtitle track. This process is called remuxing, and it's much faster than re-encoding the entire video. Because it doesn't re-compress the video, the original quality stays perfectly intact.
You can do this easily with powerful free tools like HandBrake or the command-line workhorse FFmpeg. In HandBrake, for example, you just load your video, click over to the "Subtitles" tab, and remove any tracks you don't want before hitting export. It’s a simple and effective way to remove subtitles from video files for good.
This skill is becoming more important as global content grows. In fact, the market for video subtitle translation services is expected to jump from USD 0.16 billion in 2024 to USD 0.32 billion by 2033. This explosion in localized content means that knowing how to manage—and sometimes remove—subtitles is a key part of the modern video workflow. You can explore more about this growing market on Business Research Insights.
Conquering Hardcoded Subtitles With Smart Techniques

When subtitles are burned directly into your video frames, you've stumbled upon hardcoded subtitles. These aren't a separate layer you can just toggle off; they are part of the video image itself, which makes removing them a bit of a challenge. But don't worry, you’re not stuck. With the right approach, you can still get a clean, professional-looking video. This is where clever editing and modern AI tools step in to remove subtitles from video files that seem permanently marked.
AI-Powered Subtitle Removal
The best way to deal with hardcoded text is to use specialized AI tools. These platforms are designed to understand the content of a video, not just the pixels. They can tell the difference between the text and the background, and then intelligently reconstruct the area behind the subtitles. This process is often called inpainting, where the software essentially "paints in" the background that was hidden by the text.
A tool like SnapCaptionRemover is built specifically for this job. Instead of just blurring or cropping out the text, it analyzes the frames around the subtitles to create a clean background that blends in naturally with the rest of the scene.
This screenshot shows the simple drag-and-drop interface of SnapCaptionRemover, a great feature for anyone who needs a quick, straightforward solution.
The interface is all about simplicity. You just upload your video, and the AI takes care of the tricky parts of detecting and removing the text.
Traditional Workarounds: Cropping and Blurring
While AI gives you the cleanest result, older methods can still be useful, especially for quick fixes or if the subtitles are in a less important part of the screen.
- Strategic Cropping: If the subtitles are located at the very top or bottom of the video, away from the main action, you can simply crop the video frame. This involves trimming a small strip off the edge, effectively cutting the subtitles out. The main drawback is that it changes your video's aspect ratio, which might not work for every project.
- Applying a Gaussian Blur: Another technique is to apply a localized blur over the subtitle area. This doesn't actually remove the text, but it makes it unreadable and far less distracting. This method works best when the background behind the subtitles is already a bit blurry or doesn't have much detail. Professional software like Adobe After Effects has precise masking tools that let you apply a blur that even follows the text if it moves.
It’s important to be realistic about these methods. Cropping changes your video's composition, and a blur can be a noticeable compromise. When you put them head-to-head, AI inpainting almost always provides a cleaner, more professional final product by keeping the original frame intact and rebuilding the background. For most situations where quality is a priority, an AI tool is the best way to cleanly remove subtitles from video.
Choosing The Right Tools For Your Situation And Budget

The market is flooded with tools that promise to remove subtitles from video, and it’s easy to get lost in the noise. Picking the right one isn't about finding the "best" tool overall, but the best tool for your specific job, skill level, and budget. Let’s cut through the confusion and look at what really works.
For anyone who needs to quickly get rid of text overlays, a specialized AI tool is often the most direct path. These tools are designed for one purpose and often excel at it, offering a straightforward experience for those who don't want to get tangled up in complex video editing software. You can learn more about how these solutions work by checking out our guide on the best video text removers available today.
A Look at Free vs. Paid Options
Your choice between a free or paid tool often comes down to one crucial question: are you dealing with soft or hardcoded subtitles? Your answer will point you in the right direction.
- Free Powerhouses (VLC, HandBrake, FFmpeg): These are fantastic for handling soft subtitles. Since softsubs are just a separate data track, these programs can simply strip them out without altering the video quality. FFmpeg, a command-line tool, is the go-to for professionals needing to batch process large libraries, offering unmatched control. However, these tools are generally useless for hardcoded subtitles.
- Paid Professional Suites (Adobe Premiere Pro): For video editors already working within the Adobe ecosystem, Premiere Pro offers tools to mask or blur subtitles. While effective, this requires manual work and a subscription. It’s a good option if you already have the software but might be overkill if subtitle removal is your only goal.
- Specialized AI Tools (SnapCaptionRemover): When you’re facing hardcoded subtitles, AI is your best bet. These tools analyze the video, identify the text, and use inpainting to reconstruct the background. While some are paid, many, like ours, offer a robust free experience that delivers high-quality results without a price tag.
Making The Right Choice for Your Project
To help you decide, I’ve put together a quick comparison of the most common tools and what they're best suited for. This table gives you a clear, at-a-glance look at where each tool shines, so you can build a toolkit that’s right for your specific needs.
Subtitle Removal Tools Comparison
Detailed comparison of popular subtitle removal tools and their capabilities
| Tool Name | Price | Soft Subtitles | Hard Subtitles | Ease of Use | Best For |
|---|---|---|---|---|---|
| VLC Media Player | Free | Yes | No | Easy | Temporarily disabling softsubs for viewing. |
| HandBrake | Free | Yes | No | Moderate | Permanently removing softsubs from files. |
| SnapCaptionRemover | Free | N/A | Yes | Easy | Quick, high-quality removal of hardcoded text. |
| Adobe Premiere Pro | Subscription | Yes | Yes (Manual) | Hard | Professionals already using it for video editing. |
As you can see, free tools like VLC and HandBrake are perfect for soft subtitles, while a dedicated tool like SnapCaptionRemover is the ideal choice for tackling tricky hardcoded text. For seasoned professionals, Adobe Premiere Pro remains a versatile, albeit more complex, option.
Solving The Problems Everyone Runs Into
Even with a solid plan and the right software, trying to remove subtitles from a video can sometimes throw you a curveball. It’s definitely frustrating when you think you’ve done everything right, but the final video is glitchy or the subtitles are still stubbornly there. Let’s walk through some of the most common hiccups and how to fix them like a pro.
Diagnosing and Fixing Common Errors
A classic issue I see all the time is the audio falling out of sync with the video. This usually happens when the video is being re-encoded, especially if your source file was heavily compressed to begin with. As the software rebuilds the video without the subtitle data, tiny timing errors can creep in, throwing the whole thing off.
- The Fix: My first piece of advice is to always back up your original file before you do anything. If you hit a sync problem, try using a different program or re-encode using a constant frame rate setting instead of a variable one. Sometimes, just running the process a second time magically fixes it.
Another headache is the subtitle track that just won’t go away. You’ve gone through the removal steps, but there they are. This often means there are multiple subtitle streams embedded in the video container, which is pretty common with MKV files. You might have successfully removed one, but another one is still hiding in there.
- The Fix: Use a tool like VLC's Media Information panel to peek inside the file. It will show you every stream it contains. Once you spot multiple subtitle tracks, you can use a program like HandBrake to select and remove all of them for good.
Maintaining Quality and Compatibility
Ending up with a corrupted or unplayable file is another major frustration. This can be triggered by anything from an interruption during the export process to a clash between the video's codec and the removal tool. To avoid this, make sure you have plenty of free disk space and close any other demanding applications before you start.
The demand for clean, adaptable video content is huge. In fact, the film subtitling market was valued at approximately USD 8.5 billion in 2024, and it's expected to keep growing. This shows just how massive video localization is, where adding and removing subtitles are everyday tasks. You can find out more about these market trends from Cognitive Market Research.
As you tackle your own projects, remember that every problem has a solution. If you're often dealing with subtitles that are permanently part of the video image, you might also want to check out our guide on how to find the best text remover from video.
Professional Techniques For Consistently Great Results
Going from one-off fixes to a more polished approach is all about building a solid workflow. This is how you stop seeing subtitle removal as a chore and start treating it as an efficient, repeatable process that delivers quality every time. The real goal isn't just to get rid of the text, but to make sure the video's integrity is kept intact from beginning to end.
Building Efficient Workflows
If you're a professional dealing with big batches of video content, you know that efficiency is king. Instead of tackling files one by one, the pros lean on automation and presets to do the heavy lifting. For instance, when you're working with soft subtitles, you can create a preset in a tool like HandBrake that automatically removes all subtitle tracks. This lets you queue up dozens of files, press start, and go do something else.
This same logic applies when you're dealing with tricky hardcoded subtitles. If you often find yourself removing text from videos that have similar layouts—maybe the same dimensions or text placement—you can create templates in Adobe After Effects or your preferred video editor. These templates can have pre-configured masks or blur layers all set up and ready to go, which drastically cuts down on the manual work for each new video.
Optimizing for Quality and Consistency
Getting the same great result across different video files is what separates the pros from the amateurs. This all starts with understanding your output requirements before you even think about hitting the export button.
Here are a few things to keep in mind:
- Standardize Your Settings: Make a decision on your target bitrate, resolution, and format and stick to it. Applying the same settings to every video creates a uniform look and feel across your projects.
- Create Quality Checkpoints: Before you commit to exporting a full-length video, process a small 15-30 second clip first. This quick test is a lifesaver—it lets you confirm the audio is synced and the video quality is up to snuff, preventing you from wasting hours on a flawed export.
- Document Your Process: It might sound tedious, but keeping a simple log of the tools and settings that worked best for certain types of videos will save you a ton of guesswork down the road.
By putting these strategies into practice, you’ll build a system you can rely on. You'll not only get better results but also find yourself working faster and more predictably on all your future projects.
Ready to achieve consistently clean results on your videos with hardcoded subtitles? Try the simple, AI-powered solution at SnapCaptionRemover for a flawless finish every time.