Remove Letters in Photoshop: Pro Tips to Perfect Your Photos
So, you've got a fantastic photo, but there's just one problem: unwanted text is ruining the shot. Whether it's a timestamp, a watermark, or a caption you wish wasn't there, getting rid of it without leaving a trace is key. Luckily, Adobe Photoshop gives you a couple of brilliant ways to handle this.
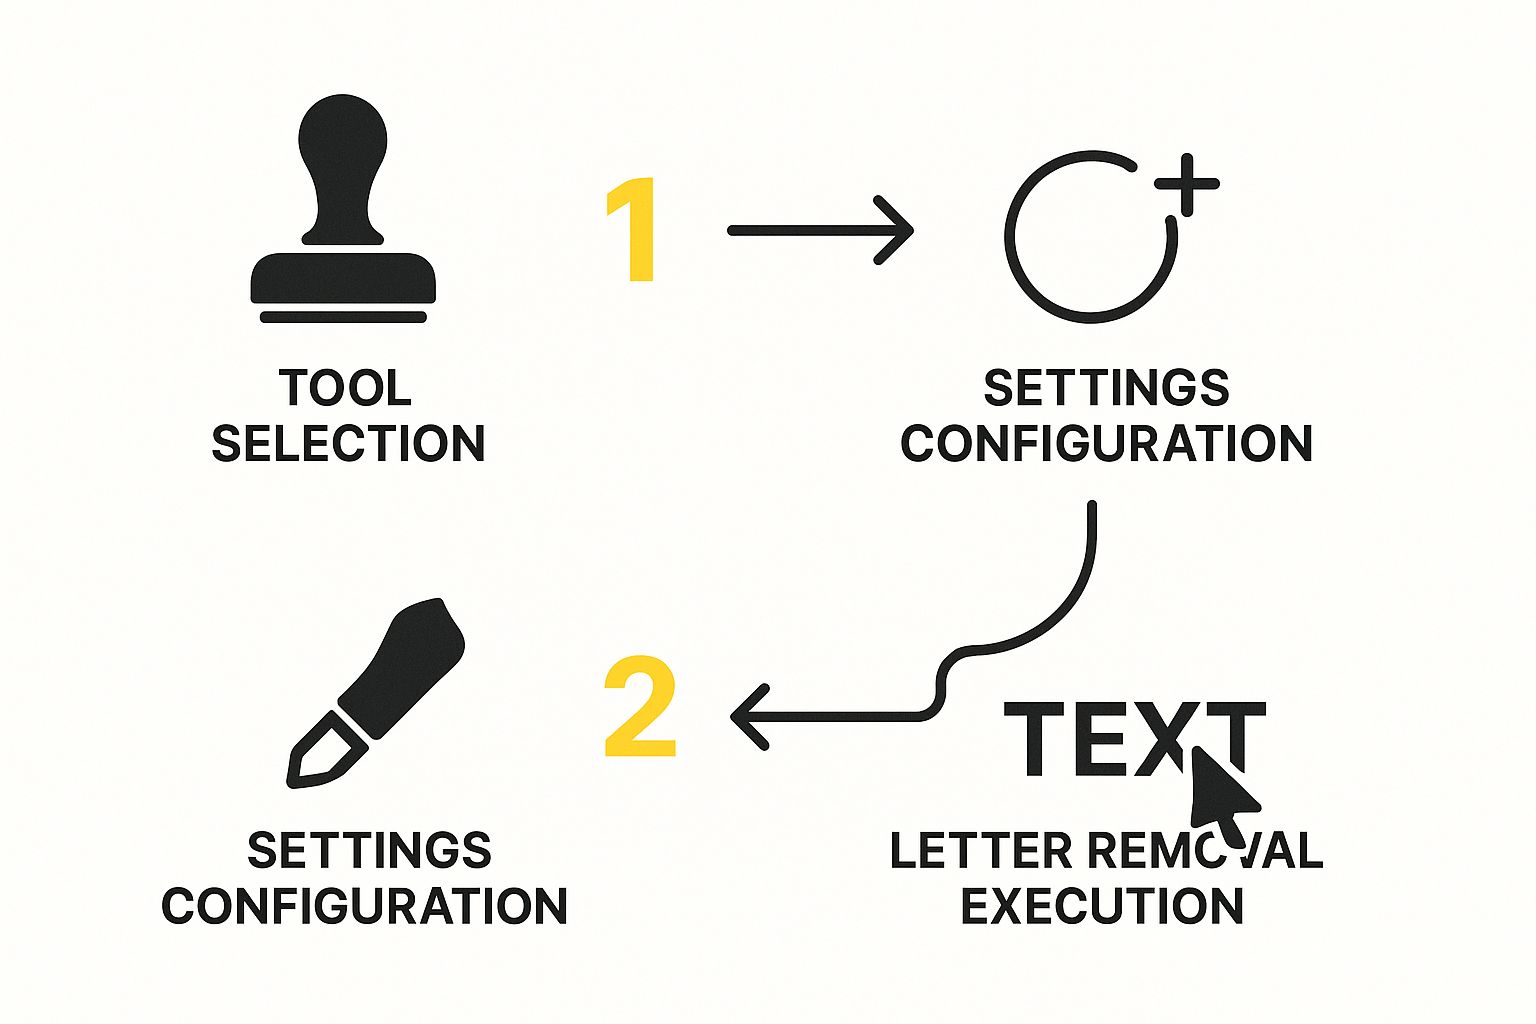
The two workhorses for this job are Content-Aware Fill and the Clone Stamp Tool. Think of them as the automatic and manual transmissions of photo editing. One is fast and does a lot of the thinking for you, while the other gives you granular control for those tricky situations.
Choosing Your Text Removal Weapon
Deciding which tool to use really comes down to the background of your image.
Is the text sitting on a relatively simple, non-repetitive background like a clear sky, a smooth wall, or a grassy field? Content-Aware Fill is your best friend here. It’s incredibly smart and often gets the job done in seconds. In my experience, this tool can cut editing time by 50% compared to the old-school manual methods.
But what if the text covers a complex pattern, like a brick wall, a patterned shirt, or a detailed cityscape? That's where the Clone Stamp Tool shines. It requires a more hands-on approach, but the precision you get is unmatched for complex textures where you need to maintain the pattern perfectly.
Let's take a quick look at how these tools stack up.
Photoshop Text Removal Tools At a Glance
| Tool Name | Best For | Complexity |
|---|---|---|
| Content-Aware Fill | Simple backgrounds (sky, walls, grass) | Beginner |
| Clone Stamp Tool | Complex patterns & detailed textures | Intermediate |
| Spot Healing Brush | Small specks or single letters | Beginner |
Ultimately, knowing when to use each tool is what separates a good edit from a great one. For most quick fixes on simple backgrounds, Content-Aware Fill is a game-changer. For everything else that needs a careful touch, the Clone Stamp is the reliable, professional choice.
What About an Even Easier Way?
If Photoshop feels a bit much or you're just looking for a super-fast solution, there are specialized tools built for this exact task. One of the best I've come across is SnapCaptionRemover.
This online tool is designed to do one thing and do it well: remove text overlays from images automatically. It's perfect for quickly cleaning up screenshots or social media images without diving into Photoshop's layers and toolsets.
How to Prepare Your Image for Editing

Before you jump into removing text, a little prep work can save you a world of frustration. It’s tempting to dive right in, but taking a few moments to set yourself up for success is a habit that separates the pros from the amateurs. A clean, high-quality image is always the best place to start. Many of the core ideas from these tips for professional tattoo photography apply here, too—it's all about getting a clean shot to work with.
The absolute first thing I do, every single time, is duplicate the background layer. You can do this in a second by hitting Ctrl+J (Windows) or Cmd+J (Mac).
This creates a safety net. You’re essentially making a copy to work on, leaving your original photo untouched underneath. If you ever mess up completely, you can just delete the working layer and start fresh. It's a non-negotiable step for any non-destructive editing.
Setting Up Your Workspace
With your layer safely duplicated, it's time to get your digital workspace in order. This isn't just about being tidy; it's about making the job easier.
- Zoom In Close: Get right up on the text you're removing. Use the Zoom Tool (Z) or the navigator panel to get a clear view of the pixels. You need to see the textures and colors you'll be blending.
- Analyze the Background: Take a hard look at the area immediately around the letters. Are there subtle gradients? A specific texture? Weird lighting? Catching these details now is the key to a seamless final edit.
- Keep Your Panels Open: Make sure your Layers and History panels are visible. The Layers panel is your command center, and the History panel is your "undo" button on steroids, letting you step back through your recent changes.
By preparing your workspace, you're not just organizing your screen—you're preparing your mind for the detailed work ahead. A clean setup leads to cleaner edits.
If you'd like a deeper dive, our guide on how to erase letters in Photoshop builds on these fundamental steps with more detailed examples.
Using Content-Aware Fill for Fast Results
When you need to get rid of text on a simple background, Content-Aware Fill is usually the quickest and easiest tool for the job. I find it works best on things like portraits with a blurry background or clearing a sign from a wide-open beach photo. Essentially, Photoshop looks at the pixels right around the text you want to remove and intelligently fills in the gap.
Your first move is to select the text. I usually reach for the Lasso Tool to draw a rough outline, but the Object Selection Tool can also do a great job of finding the text for you. A little pro-tip: don't make your selection too tight. Giving it a little breathing room by including a sliver of the background often helps Photoshop create a more natural blend.
With the text selected, just head up to the menu and click Edit > Content-Aware Fill. This is where the magic happens.
Refining the Fill for a Perfect Result
Once you’re in the Content-Aware Fill workspace, you'll see a live preview of what the final image will look like. Your original image on the left will have a green overlay, which is the sampling area—this tells you where Photoshop is grabbing pixels from to create the fill.
If the first attempt looks a bit funky, you can clean it up. Let's say you're removing text from a grassy field, but Photoshop is pulling in parts of a nearby flower. All you have to do is paint over that flower to tell Photoshop, "Hey, don't use this part." It gives you a ton of control.
Key Takeaway: The secret to mastering Content-Aware Fill is tweaking the sampling area. Guiding Photoshop on exactly which pixels to borrow is how you get a seamless, professional result every time.
This workflow is a core part of photo editing, whether you're using automated tools or doing manual touch-ups.
As the image shows, getting your tool settings right is crucial. Photoshop has come a long way since it was first created back in 1987. After more than 35 years of development, features like the Healing Brush and Content-Aware Fill have become incredibly powerful for this exact kind of editing task.
But sometimes, Content-Aware Fill just won’t cut it, especially with busy, complex backgrounds. For those trickier situations, you'll need to turn to other methods. We break down some alternative approaches in our complete guide on how to delete text in Photoshop.
Mastering the Clone Stamp for Precision Edits
While automated tools are fantastic, they can sometimes fall short, especially with tricky textures or busy backgrounds. When you need to remove letters in Photoshop with surgical precision, the Clone Stamp Tool is your go-to. This tool gives you complete manual control, essentially letting you paint with pixels you've borrowed from another part of the image.
Getting the hang of the Clone Stamp is all about developing a good rhythm and a keen eye. The basic move is straightforward: hold down Alt (Windows) or Option (Mac) and click on a clean area you want to copy from. This "samples" the source pixels. Then, you just release the key and start painting over the text you want to erase.
The biggest mistake I see people make is sampling once and then trying to paint over the entire text in one long stroke. This almost always leaves a blurry, repetitive smear that screams "Photoshop!" The real secret is to constantly resample from different spots around the text. It's this continuous sampling that makes the final result look natural.
Fine-Tuning Your Brush for Seamless Blending
Your technique is only half the battle; your brush settings are just as crucial. Before you even think about painting, you need to dial in your brush to match the image. A hard-edged brush is a dead giveaway, creating harsh, artificial lines that are impossible to miss.
Here are the settings I always adjust first:
- Hardness: For this kind of work, a soft-edged brush is almost always the answer. I usually start with a Hardness setting between 0% and 25%. This gives you a nice feathered edge that helps the new pixels blend right in.
- Opacity: Never try to cover the text in one pass. By lowering your brush Opacity to around 30-50%, you can build up the cloned texture gradually. This layering approach is much more forgiving and helps you match the original texture without creating ugly, blotchy patches.
- Size: Your brush should be just a little larger than the letters you're trying to cover. A pro-tip is to use the [ and ] bracket keys to quickly resize your brush on the fly.
The goal isn't to obliterate the text instantly, but to gently paint over it with new, clean texture. Think of it less like an eraser and more like a detailed paint-by-numbers, where you are borrowing colors and patterns from the immediate vicinity.
By combining a soft, low-opacity brush with frequent resampling, you can tackle even the toughest jobs. Imagine removing a logo from a knitted sweater or text from a grainy wooden sign—this method allows you to reconstruct the underlying texture believably. Your edits become not just clean, but completely invisible.
Advanced Tips for Tricky Text Removal

Let's be honest, sometimes a single tool just doesn't cut it. When you need to remove letters in Photoshop from a really complex background, the secret is to combine your tools. This is exactly how the pros get those seamless results on the toughest jobs.
A powerhouse combination I use all the time is the Patch Tool and the Healing Brush. Imagine text that stretches from a person's shirt onto a busy, patterned wall behind them. I'd start with the Patch Tool to grab the bigger, more uniform chunks of the background. Then, I’d switch to the Healing Brush for the detailed work, carefully blending the edges and cleaning up any lingering bits of text.
A Non-Destructive Workflow is Key
If there's one habit you should build as an editor, it's working non-destructively. What does that mean? Simple: do all your major edits on new, separate layers. Never work directly on your original image.
This approach gives you a massive advantage:
- Flexibility: You can tweak the opacity of each edit layer to get the blend just right.
- Control: If a specific part of your fix looks off, you can just delete or hide that layer without affecting the rest of your work.
- Safety: Your original image layer sits untouched at the very bottom, completely safe.
For high-stakes work, like detailed product photos where every pixel matters, it might be worth looking into professional image retouching services to guarantee a flawless finish.
Expert Tip: Don't treat your History panel like a simple undo button—it’s your personal time machine. If you realize you've gone down the wrong path with an edit, you can just jump back several steps and try a different approach without starting from scratch.
When you're deep in a complex project, Photoshop's history management is a lifesaver. You can even save "snapshots" of your progress at key moments, which is incredibly handy during those marathon editing sessions.
And hey, not every job needs this level of detail. If you're in a hurry and just need a quick fix, you can always remove text from an image for free with a specialized online tool that does the heavy lifting for you.
Got Questions? We’ve Got Answers
Even with the best guide, sometimes you just hit a snag. It happens to all of us. Let's walk through some of the common questions I hear from people trying to remove letters in Photoshop so you can get back to what you do best—creating.
What’s the Go-To Tool for Erasing Text?
Honestly, there's no single magic wand here. The "best" tool really boils down to what your image looks like.
If you're dealing with text on a simple background—think a clear blue sky, a grassy field, or a plain wall—Content-Aware Fill is your best friend. It's incredibly fast and smart, analyzing the pixels around your selection and filling it in, often flawlessly, in just a few seconds.
But what if the text is sitting on something tricky, like a detailed brick wall or a shirt with a complex pattern? That’s when you need more control. The Clone Stamp Tool is your workhorse for these situations, letting you manually paint over the text with pixels you sample yourself.
My Personal Workflow: I almost always start with a quick pass of Content-Aware Fill to handle the heavy lifting. Then, I zoom in and use the Clone Stamp or Healing Brush to touch up any little smudges or weird artifacts. This combo approach is my secret to getting a clean, professional result every time.
How Do I Make My Edits Look Real on Tricky Backgrounds?
The difference between a "photoshopped" look and an invisible edit comes down to two things: patience and a light touch. Trying to cover up text in one big, clumsy stroke is a recipe for disaster. Instead, you need to build up your edits gradually.
Here’s how I do it:
- Lower Your Opacity: I rarely use the Clone Stamp at full strength. Drop the opacity to around 20-30% to build up the correction slowly.
- Soften That Brush: Always use a soft-edged brush (hardness set between 0-25%). Hard edges are a dead giveaway.
- Sample, Sample, Sample: This is the most important part. Don't just sample from one spot and paint. Continuously press Alt/Option-click on different clean areas near your target.
By dabbing and blending from multiple sources, you recreate the natural texture and lighting variations of the original background. This little trick is what makes the final edit look completely seamless.
Can AI Just Do This for Me?
Absolutely, and the technology is getting scarily good. The newer versions of Photoshop have an AI-powered Remove Tool that's a game-changer. You literally just brush over the text, and it vanishes. Adobe is constantly improving it with their Firefly AI, so it's only getting better.
If you don't have Photoshop or just need a quick fix without the fuss, there are dedicated online tools built specifically for this. They offer a super simple way to get the job done quickly.
Tired of wrestling with complex tools for a simple cleanup? SnapCaptionRemover offers a much faster way. Our AI tool automatically finds and erases text from your images in seconds—no Photoshop experience needed. Give it a try for free and see for yourself at https://www.snapcaptionremover.com.