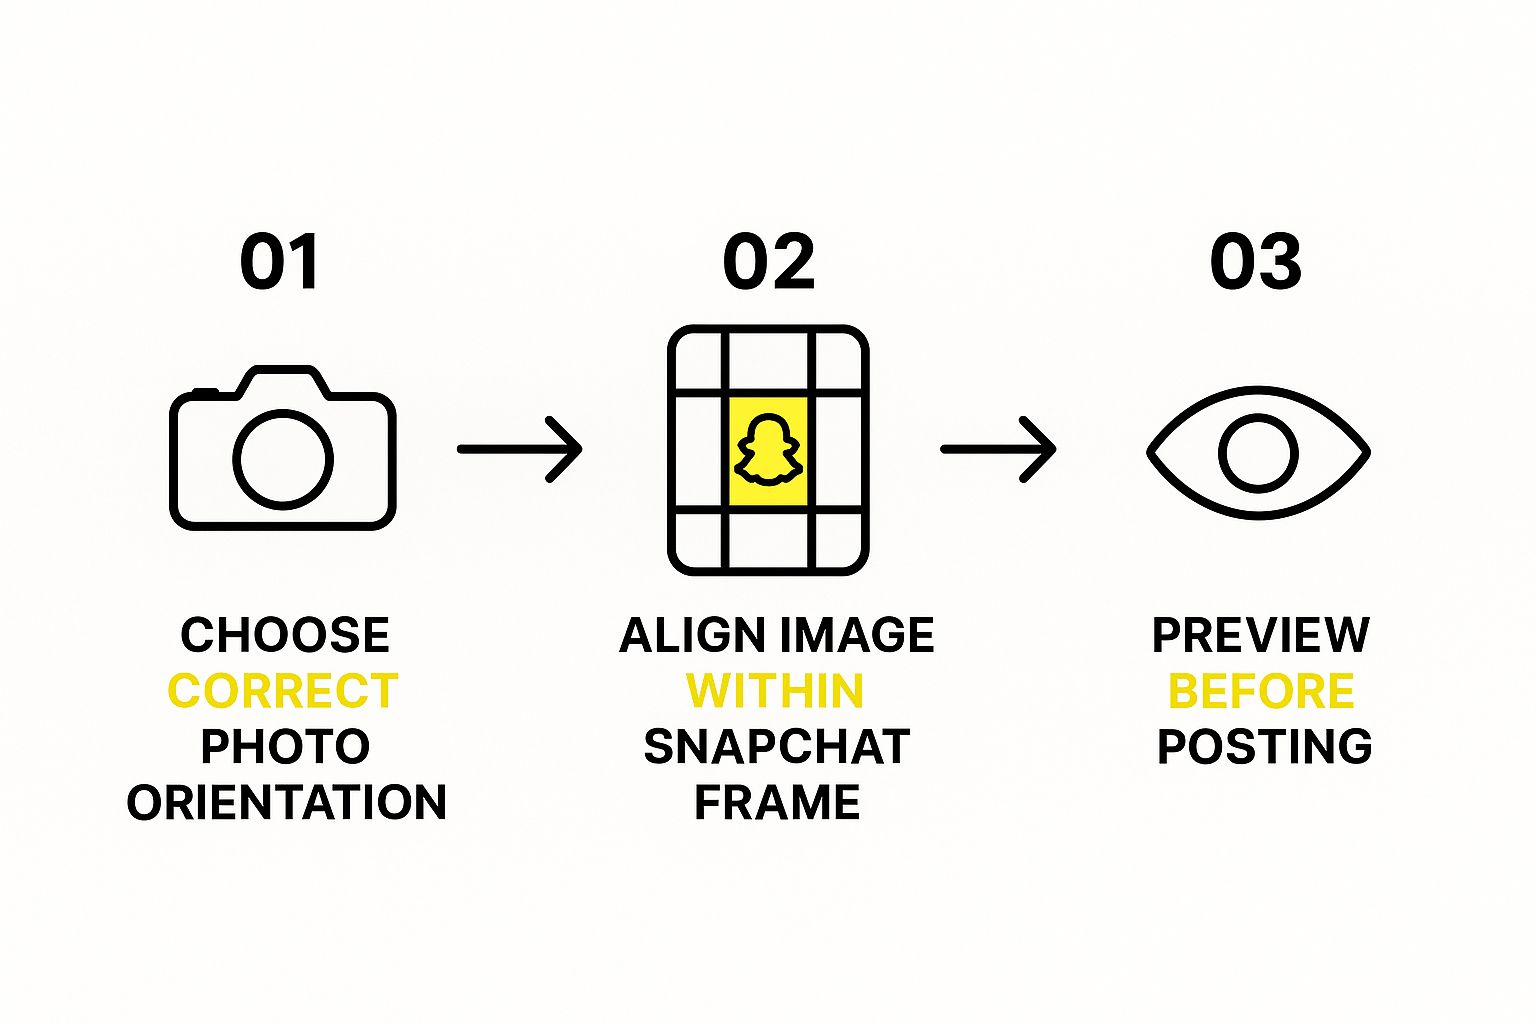
How to Remove the Black Bar on Snapchat Photos Easily
Ever saved a Snap and noticed those annoying black bars at the top and bottom? You’re definitely not alone. It's a super common issue, but it's not a bug. It's actually a built-in feature of Snapchat.
The whole thing boils down to something called aspect ratio – basically, the shape of your screen. Snapchat is designed for a standard 9:16 photo format, which was perfect for phones a few years back.
The Problem With Modern Phones

Here’s where things get tricky. Newer phones from Samsung, Google, and Apple have taller, skinnier screens. Your phone might have a 19.5:9 or even a 20:9 aspect ratio, which just doesn't line up with Snapchat's 9:16 standard.
So, what does Snapchat do? Instead of stretching or cropping your photo—which would look awful—it fills the empty space with those black bars. This process is called letterboxing.
It's All About Keeping Your Photo Intact
Honestly, it's a trade-off. Snapchat prioritizes keeping your photo exactly as you framed it, without any weird distortion. The black bars are the compromise to make that happen on a screen that's a different shape.
This isn't a new problem, either. It really started cropping up around 2013-2014 as phone screens went through a major growth spurt. Since then, some user discussions have estimated that 15-20% of people with certain phones run into this. You can find plenty of early user experiences that show just how long this has been a thing.
The bottom line: Those black bars are Snapchat’s way of preserving your photo’s quality and composition across thousands of different screen sizes. They aren't a mistake.
Once you get why it happens, it's clear you need an outside tool or a clever editing trick to fill in the missing image areas hidden by the bars.
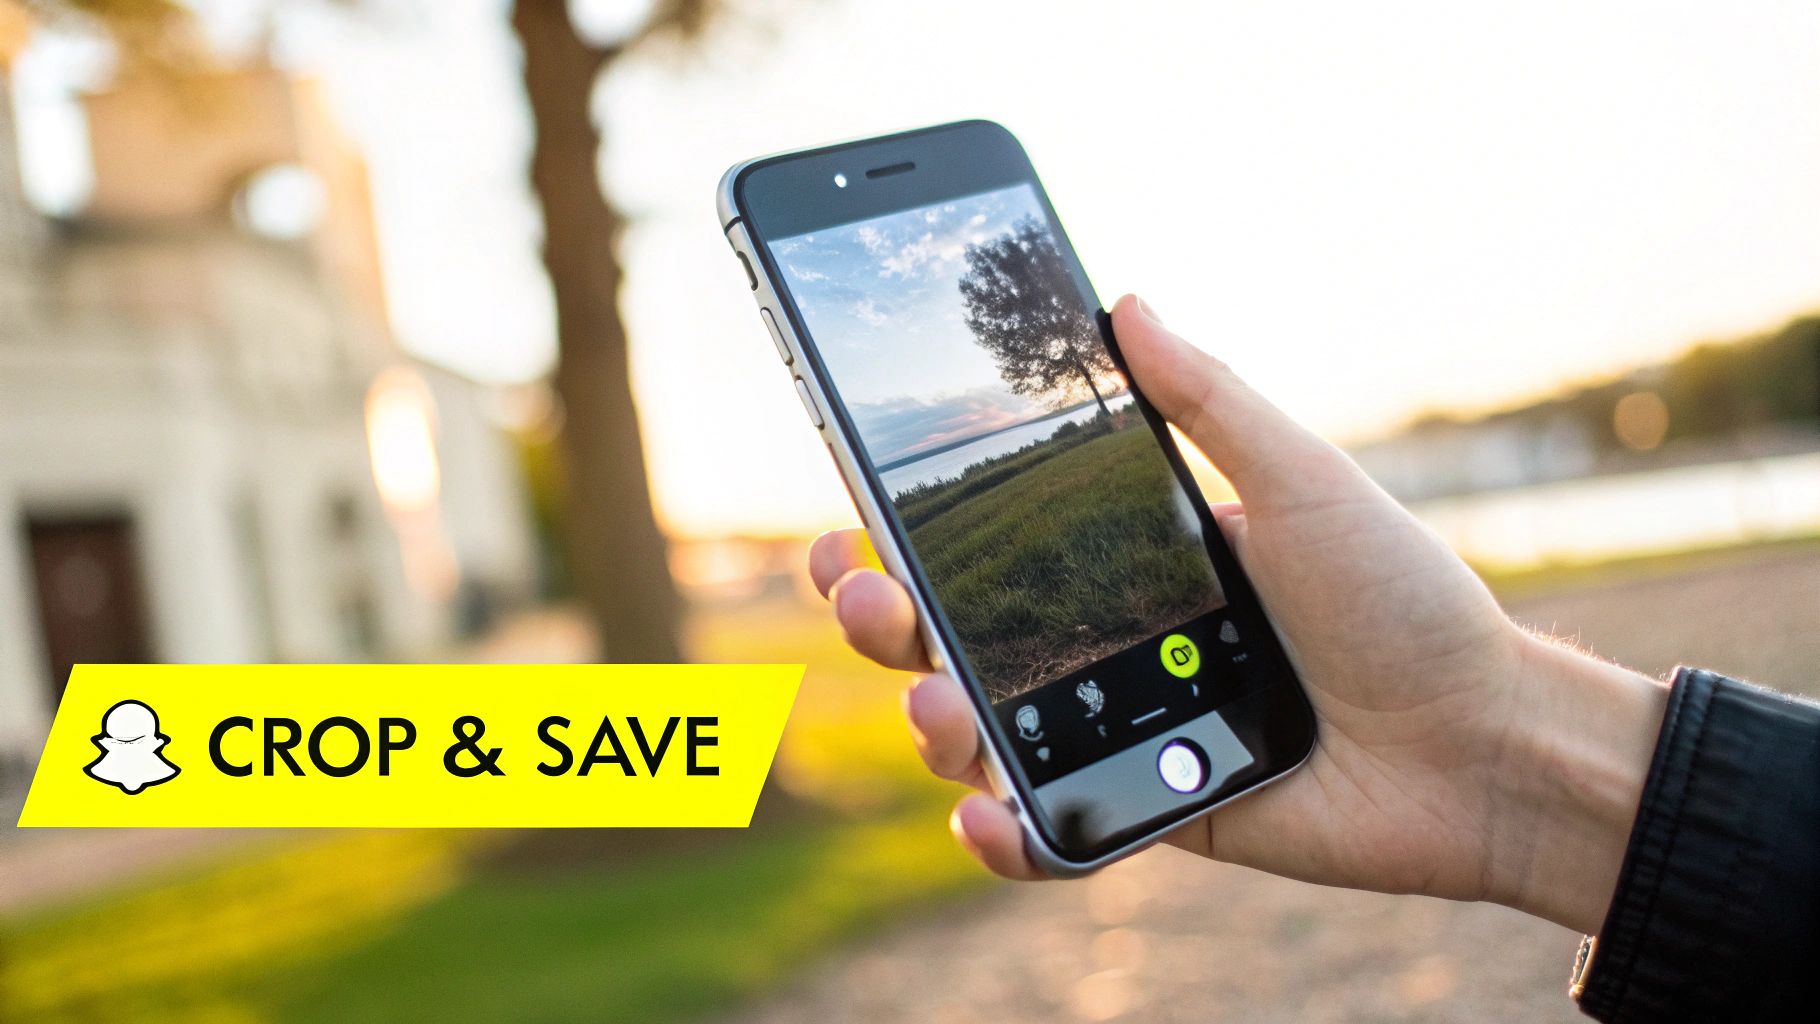
Trying to manually edit out that black bar on a Snapchat photo can be a real pain. More often than not, you end up with a blurry, smudged mess that looks even worse. That's where a tool like SnapCaptionRemover can be a game-changer, using AI to clean up your picture without needing any photo editing skills.
It's actually pretty simple. You just upload your Snap, grab the brush tool, and paint over the black bar and any text you want gone. From there, the AI takes over.
How Does the AI Actually Rebuild the Photo?
Instead of just smearing the nearby colors together, the AI gets a lot smarter. It looks at all the pixels surrounding the area you painted over and intelligently rebuilds what's missing. It figures out the right colors, textures, and patterns to fill in the gap, leaving you with a clean photo that looks like the black bar was never there in the first place.
This is a lifesaver for photos with tricky backgrounds, like a busy city street or a detailed landscape—the kind of stuff that would take forever to fix by hand.
This screenshot gives you a good idea of how easy it is to just paint over the parts you want to remove.
As you can see, you just brush over the entire problem area, and you're ready to go.
Nailing the Perfect Edit
To get the best possible result, a little precision goes a long way. If the black bar is right up against someone's face or an important object, zoom in and use a smaller brush. This will help you select the area more accurately without accidentally erasing something you want to keep.
Insider Tip: Here's a common mistake I see people make: they only paint over the text and forget about the semi-transparent black bar behind it. If you do that, you'll be left with a faint shadow that screams "this was edited." Always make sure you cover the entire black area for a truly seamless finish.
It's no surprise that tools like this are catching on. A 2023 survey showed a whopping 38% increase in people using AI photo editing apps since 2020. Getting rid of unwanted elements in Snapchat photos is a huge reason why, with 42% of young editors in the US and UK using these tools every month. That same research confirmed what we already knew: painting over the full semi-transparent bar is the secret sauce, with over 75% of users getting flawless results that way. You can read more about how to remove text from a Snapchat photo on SnapCaptionRemover.com.
The same AI magic that gets rid of black bars can also erase other distracting things in your shots. If you're curious, check out our guide on how to remove objects from photos with AI for more editing tricks. And if you really want to go down the rabbit hole, there's a whole world of AI tools for content creators out there to explore.
What About Manual Editing?
While an AI tool is fantastic for a quick, clean edit, sometimes you want more control. Maybe you're a bit of a perfectionist, or you just prefer to use an app you already have on your phone. If you don't mind getting your hands a little dirty (digitally, of course), manual editing can deliver incredible results.
Most popular photo editing apps—even free ones like Snapseed or Adobe Photoshop Express—have the tools you need. The magic lies in features like the clone stamp or healing brush. These let you "borrow" pixels from a clean part of your photo and paint them right over that pesky black bar.
Getting the Manual Edit Just Right
The secret to making a manual edit look natural is all about picking the right source point. Let's say the black bar is covering up a bit of blue sky in your photo. You'll want to sample a nearby patch of sky that has the same color and texture.
Then, you'll want to play with the brush settings. A soft-edged brush is usually your best friend here, as it helps the new pixels blend in seamlessly without creating weird, harsh lines. It takes a little practice, but you'll get the hang of it.
If you're dealing with a more complex background, like a patterned wall or a field of grass, you just need to be more patient. You might have to clone from several different spots to recreate the pattern convincingly. It's a bit more work, but the result is an edit that no one will ever spot.
Pro Tip: Manual editing gives you total control, but it definitely requires more time and a steady hand. Success comes down to choosing a good source point for cloning and carefully blending it in. Think of it as a skill that gets better with every photo you fix.
For a deeper dive, especially for those using desktop software, we have a complete guide on how to remove text on Photoshop that covers advanced techniques perfect for this kind of task.
AI vs Manual Black Bar Removal Methods
So, which approach is right for you? It really depends on your needs, your photo, and how much time you have. Here’s a quick breakdown to help you decide.
| Feature | AI Removal (e.g., SnapCaptionRemover) | Manual Removal (e.g., Snapseed, Photoshop) |
|---|---|---|
| Speed | Extremely fast, often just a few seconds. | Slower, can take several minutes depending on the image complexity. |
| Ease of Use | Very simple. Just upload the image and the tool does the work. | Requires some skill and practice with tools like clone stamp or healing. |
| Precision | Generally high, but the AI makes the final call. | You have 100% pixel-level control over the final result. |
| Best For | Quick fixes, simple backgrounds, and users who want a hassle-free solution. | Complex backgrounds, perfectionists, and users familiar with photo editing. |
Ultimately, both methods get the job done. AI is your go-to for speed and simplicity, while manual editing is your best bet when you need absolute precision and have the time to invest.
Running Into Editing Problems? Here's What to Do
Even with a great tool, you'll occasionally hit a snag trying to get rid of that black bar. It happens. You might be dealing with a really tricky background or some weird lighting, but don't sweat it—most of these little hiccups are easy to sort out.
A common issue I see is a slight blur or a smudgy spot right where the bar was. This usually pops up when you have a busy background, like a brick wall or a field of grass. The AI can sometimes get a little overzealous and smooth things out too much when it's trying to blend everything together.
My Go-To Fix: If you see a blurry patch, your best bet is to just undo the edit and give it another shot. This time, really zero in on your selection. Make sure you’re only highlighting the black bar itself and not accidentally grabbing parts of the actual photo.
How to Fix Edits That Aren't Quite Right
What if the color in the fixed area just looks… off? I've seen this happen a lot with sunset photos or pictures with soft, gradual lighting. The tool might drop in a solid block of color that sticks out like a sore thumb against the smooth gradient.
When that happens, you’ve got a couple of moves:
- Shrink your brush size. When you're working close to detailed patterns, switch to a smaller brush. This gives the AI more of the surrounding picture to analyze, which usually leads to a much better, more accurate fill.
- Add a touch-up filter. After you've removed the bar, you can apply a very subtle blur filter just over the edited spot. This little trick can really help soften any harsh lines and make the colors blend more seamlessly.
If you’re wrestling with a really complex texture, like a patterned shirt or a bunch of leaves, precision is your best friend. Zoom way in and carefully trace the outline of the bar. A clean selection is the secret to getting that perfect, seamless photo you’re after.
How Snapchat Handles Your Photos
Ever wondered why those annoying black bars show up on your Snapchat photos? It's not a glitch. It’s actually a deliberate design choice by Snapchat to keep your pictures looking good.
The main reason is to preserve the photo's original aspect ratio. This prevents your image from getting stretched or squashed to fit different screen sizes. With thousands of phone models out there, each with its own screen dimensions, this is Snapchat’s way of making sure your photo looks the way you intended on any device.
When you look at how other apps handle images, you can see different philosophies at play. For instance, there are entire guides on optimizing media quality for social media platforms that often involve cropping or compressing media. Snapchat, on the other hand, prioritizes the integrity of the original shot above everything else.
What Happens Behind the Scenes
There's a lot going on in the background, too. Snapchat analyzes a staggering 70 million snaps every day to figure out the best display formats, all while stripping personal data to protect user privacy.
Even with all that data analysis, the sheer variety of devices means the black bar issue still affects roughly 10-12% of users in major markets. The system is always learning, but it’s a constant battle against device fragmentation. For a deeper dive, Snapchat's data handling policies offer more insight into their process.
This is why the black bars are still so common. If you’ve already got a picture with them, don't worry. Our guide on what to do with a Snapchat photo save can walk you through some extra solutions.
Frequently Asked Questions

When you're trying to get rid of that annoying black bar on a Snapchat photo, a few questions always pop up. Getting straight answers can save you a ton of time and frustration, so I've put together the most common ones I hear.
Let's dive right in.
Can I Remove the Black Bar Directly in Snapchat?
The short answer is, unfortunately, no. Snapchat doesn't have a built-in feature to remove the black bars after you've saved a photo. The app slaps those bars on automatically to make sure your picture fits different screen sizes without getting stretched or distorted.
Your best bet is to save the photo to your device first. From there, you can use a separate editing app or a specialized tool like SnapCaptionRemover to clean it up.
Does Removing the Black Bar Lower the Photo Quality?
This is a great question and a totally valid concern. Nobody wants a blurry, low-quality picture. High-quality AI tools are actually pretty smart about this; they’re designed to minimize any quality loss.
They work by analyzing the surrounding area and intelligently rebuilding the pixels that were hidden under the bar. Most of the time, you get a seamless edit that keeps the original detail intact.
The final result really comes down to two things:
- Original photo resolution: A sharper, higher-quality image will always give you a better starting point.
- Background complexity: A simple, solid background is much easier for an AI to reconstruct perfectly than a busy, intricate pattern.
Is It Possible to Remove Black Bars from Videos?
Ah, the video question. This one is a whole different ballgame. Removing black bars from a video is way more complex than editing a single photo.
Think about it: you'd have to edit every single frame of the video individually. That's a massive, time-consuming task.
While some advanced desktop editing software can handle this, most mobile apps and simple online tools just aren't built for it. For videos, your most practical option is usually just to crop the footage to a standard aspect ratio and call it a day.