How to Erase Letters in Photoshop: Easy Step-by-Step Guide
Ever find yourself with a perfect photo, only to have it ruined by distracting text? It’s a common frustration, but luckily, Adobe Photoshop has a whole arsenal of tools designed to handle this exact problem. Forget guesswork. I'm going to show you which tools to grab and when, whether you need a quick fix or a pixel-perfect removal.
We’ll cover everything from the almost magical Content-Aware Fill, perfect for tricky backgrounds, to the classic Clone Stamp Tool, which gives you complete manual control.
Your Quick Guide to Removing Text in Photoshop
Think of this as your starting block. Before we jump into the step-by-step tutorials, it’s crucial to understand the 'why' behind each technique. By the time you finish this overview, you'll have a clear idea of which tool is right for your specific image.
Knowing how to cleanly erase text is a fundamental skill. Maybe you're a marketer cleaning up a stock photo, or a photographer trying to get rid of a distracting street sign. The secret is realizing that there's no single "best" way—it all depends on the image you're working with.
The Right Tool for the Job
Picking your tool comes down to one thing: the background. If the text is on a simple, solid color, you can get away with a quick and easy method. But if it's sprawled across a complex pattern like a brick wall or a detailed landscape, you'll need a more sophisticated approach.
Photoshop has come a long way since it first launched back in February 1990. Early on, you were stuck with basic tools like the Lasso and Magic Wand. A huge leap forward came in 1991 with the introduction of Paths, which finally gave designers a way to make precise selections around letters for cleaner edits. If you're curious, you can learn more about how the software has evolved by exploring the history of Photoshop's development.
Pro Tip: Always work on a separate layer! Before you do anything else, duplicate your background layer by pressing Ctrl+J (Windows) or Cmd+J (Mac). This is your safety net—if you make a mistake, you can just delete the layer and start again without damaging your original image.
To help you choose, let’s look at the main tools we'll be using.
Choosing the Right Photoshop Tool for Text Removal
Deciding which tool to use can be tricky. This table gives you a quick-and-dirty comparison to point you in the right direction based on your image and skill level.
| Tool Name | Best For | Difficulty Level |
|---|---|---|
| Content-Aware Fill | Complex, textured backgrounds (e.g., grass, fabric, skies) | Easy |
| Clone Stamp Tool | Areas needing precise manual control and pattern matching | Medium |
| Spot Healing Brush | Small, isolated blemishes or letters on simple backgrounds | Easy |
| Patch Tool | Larger, irregular areas on relatively consistent textures | Easy-Medium |
Each tool has its strengths. The Content-Aware Fill is often your best first bet for busy backgrounds, while the Clone Stamp is your go-to when you need to maintain a perfect, repeating pattern. Don't be afraid to combine them to get the best result
Mastering Content-Aware Fill for Seamless Edits
When you're trying to erase letters from a tricky background—think wood grain, patterned fabric, or a busy cityscape—Photoshop's Content-Aware Fill is an absolute lifesaver. This isn't just a simple color fill; it's a smart tool that looks at the pixels around your selection and intelligently cooks up a patch that blends right in. It’s the closest thing to magic in photo editing.
The secret to getting a great result starts with your selection. Grab the Lasso Tool and carefully draw an outline right around the text. Try to keep it tight. If you select too much of the surrounding background, you might give Photoshop mixed signals, which can lead to a blurry or mismatched patch. A little precision here goes a long way.
Fine-Tuning Your Fill for Perfect Results
With your text selected, head up to the menu and click Edit > Content-Aware Fill. This brings up a new workspace where you get to be the director. On the left, you'll see your image with a green overlay. This green area is what Photoshop is "sampling" from to create the fill. If it's picking up pixels from an area you don't want—like a different texture or a person's face—just paint over that part of the green overlay to tell Photoshop to ignore it.
This level of control is fantastic. Imagine you're removing a brand name from a plaid shirt. You can literally tell Photoshop to only use the clean plaid pattern for its sample, guaranteeing the final result looks completely natural.
Don't forget to play with the settings in the dialog box on the right. They can make a huge difference.
- Color Adaptation is great for getting the brightness and contrast just right.
- Rotation Adaptation lets Photoshop rotate parts of the sample to better match repeating patterns.
A clean, tight selection and a well-defined sample area are everything. Spending an extra 10 seconds refining these will save you so much cleanup time later. It's a trade-off that's always worth it.
If you're curious about other AI-powered editing tools and techniques, we cover a ton of them on our blog. You can find more guides and articles over at the SnapCaptionRemover Blog.
Beyond Content-Aware Fill, one of the most fundamental skills for this kind of work is using layer masks for non-destructive edits. The image below breaks down this simple but powerful workflow, showing how you can hide parts of an image without permanently deleting them.
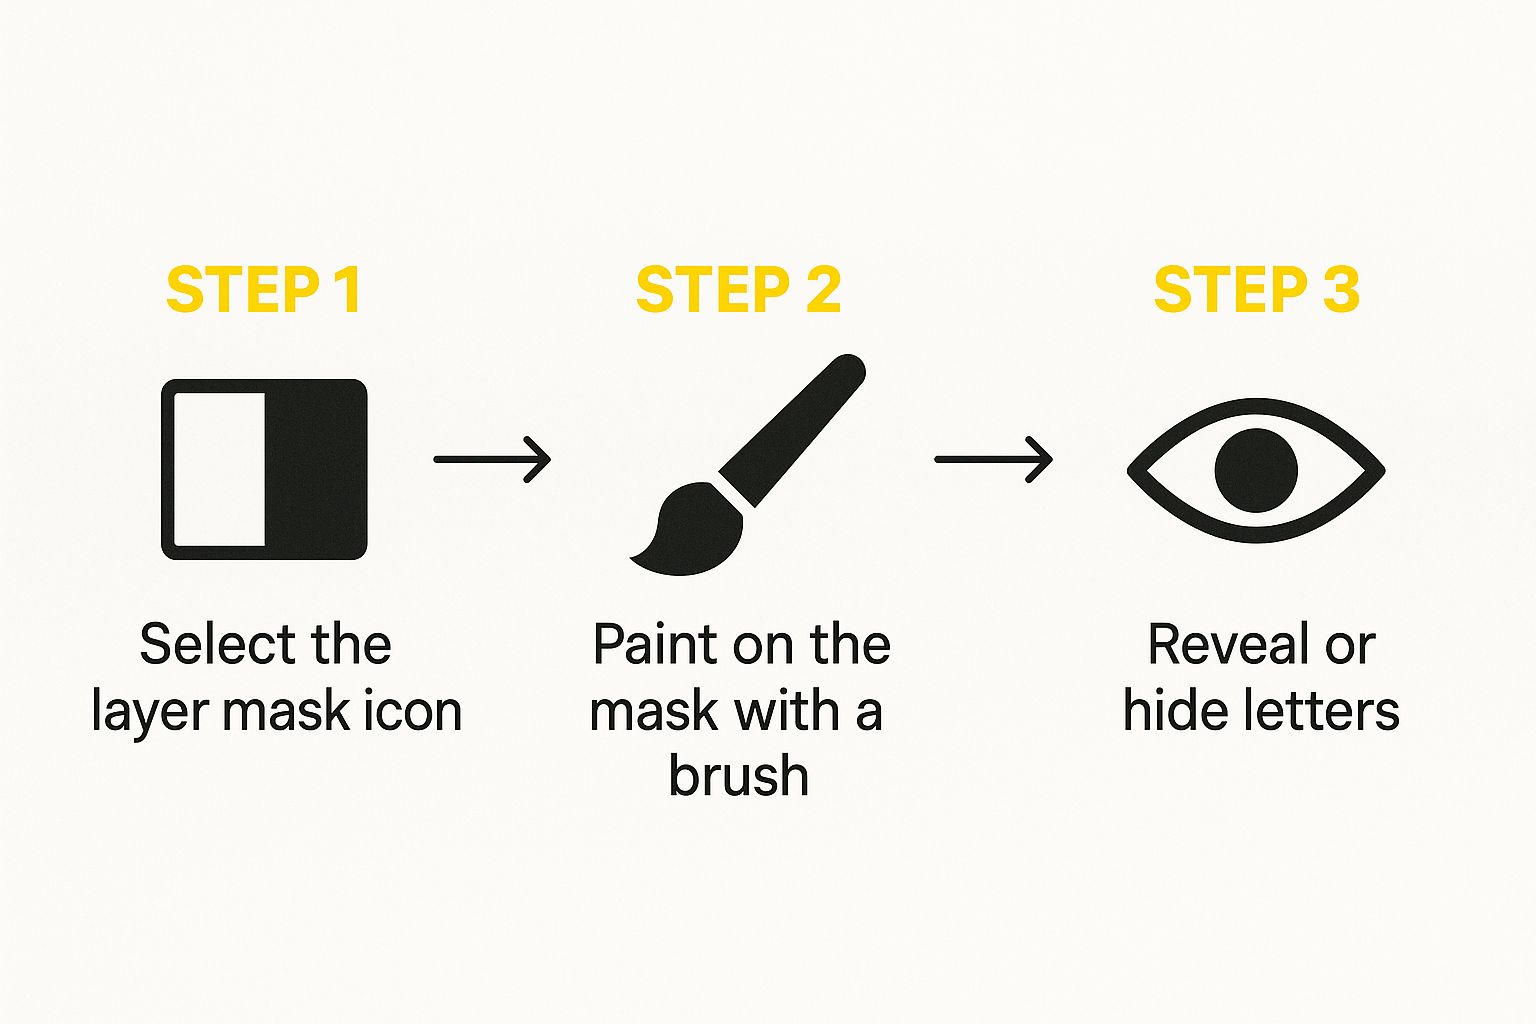
As you can see, erasing letters is as simple as painting on a mask. This gives you the ultimate flexibility because you can always go back and tweak your changes without ever damaging the original photo.
Using The Clone Stamp Tool For Precision Control
 Automated tools are great, but there are times when you need to get your hands dirty for a truly flawless edit. For those moments, the Clone Stamp Tool is your best friend. It gives you direct, pixel-by-pixel control, making it an absolute must-have for any serious retoucher's toolkit.
The concept is simple: you copy pixels from one part of the image and "paint" them over another. It’s perfect for erasing letters on tricky, textured surfaces where automated fills just can't keep up.
Think about removing text from a brick wall. A tool like Content-Aware Fill might get you 90% of the way there, but it often leaves behind a tell-tale soft smudge. It just can't replicate the sharp mortar lines or the gritty texture of the bricks. This is precisely where the Clone Stamp excels, allowing you to meticulously rebuild the background, piece by piece.
Setting Up Your Tool For Success
First things first, grab the Clone Stamp Tool (just hit S on your keyboard). Before you do anything else, glance up at the options bar at the top of your screen. Getting these settings right from the start is the key to a seamless blend.
- Brush Size: You'll want to match your brush size to the area you're working on. I tend to use a smaller brush for more precise work, especially around the edges of the letters.
- Hardness: A soft-edged brush (meaning low hardness) is almost always the way to go. It feathers the edges of your strokes, helping them blend invisibly into the rest of the image.
- Opacity: I rarely work at 100% opacity. Try starting around 70-80%. This lets you build up the texture gradually instead of stamping on a heavy, obvious patch.
With your brush settings dialed in, the most important step is choosing your source. Hold down Alt (on Windows) or Option (on Mac), and your cursor will change to a little target. Click on a clean area of the background you want to copy—that’s now your source.
The real secret to making this look professional? Constantly resample your source point. If you just paint from the same spot, you'll end up with a weird, repetitive pattern that screams "Photoshopped!" After just a few paint strokes, Alt/Option-click a new, clean area nearby. This keeps the texture looking organic and natural.
A Practical Example
Let's go back to that graffiti on the brick wall. You’ve got your Clone Stamp ready with a soft brush.
Find a clean patch of brick right next to the letter you're erasing. Alt-click to set it as your source. Now, move your cursor over the letter and just start painting.
As you paint, you'll see a small crosshair hovering over your source point, showing you exactly what you're copying. Pay close attention to this. You need to align the texture—make sure the mortar lines from your source line up with the lines in the area you’re covering. It’s this level of detail that makes an edit completely undetectable.
Remember to resample constantly to pull from different parts of the brick. This method gives you total control over the final result, ensuring you can perfectly erase letters in Photoshop every single time.
When the Spot Healing Brush and Patch Tool Are Your Best Bet
While fancy AI tools like Content-Aware Fill get all the hype, sometimes the old-school, simpler tools get the job done faster and with less fuss. This is especially true when you just need to erase a few letters in Photoshop without jumping through a bunch of hoops. The Spot Healing Brush and Patch Tool are two of my absolute favorites for this kind of quick-fix work.
Think of the Spot Healing Brush as your magic eraser for small problems. It's what I grab when I need to get rid of little, isolated letters or blemishes, particularly if they’re on a simple background like a plain wall or a clear sky.
The beauty of this tool is its simplicity. You don't have to manually pick a source area. Just paint over the letter, and Photoshop instantly looks at the surrounding pixels to blend it away. It’s perfect for getting rid of a tiny logo or a stray character on a product shot in just seconds.
Tackling Larger Text with the Patch Tool
Now, what if you're dealing with a bigger chunk of text or something with a weird shape? That's when I switch over to the Patch Tool. It gives you more control than the Spot Healing Brush but is still incredibly intuitive.
Using it is a two-step dance. First, you draw a selection around the text you want to erase, almost like you’re using the Lasso Tool. Then, you just click inside that selection and drag it over to a clean part of the image you want to use as the replacement.
A classic example from my own work is removing those old, ugly date stamps from the corner of a scanned photograph. The numbers are often clunky and irregularly shaped, which makes the Patch Tool a perfect fit. I just draw a rough circle around the date and drag it to an empty part of the background.
This approach works wonders anytime you have a clean source area nearby to pull from. Photoshop does a great job of blending the edges for you, making the edit look completely natural. Honestly, having both of these tools in your back pocket is essential for quick and clean text removal.
Advanced Techniques for a Flawless Finish

Getting rid of text is one thing, but making it look like the text was never there in the first place? That’s the real art. This is where the pros separate themselves. My number one rule, always, is to work non-destructively. Before you touch a single pixel, duplicate your image layer by hitting Ctrl+J (or Cmd+J on a Mac). Think of this as your safety net. It lets you go wild with your edits without ever risking your original photo.
For any tricky removal job, you'll find that one tool is rarely enough. I've found the best approach is to combine the strengths of different tools. For instance, I'll often start with Content-Aware Fill to do the heavy lifting. It's incredibly fast at removing the bulk of the letters and roughing in a replacement background.
Combining Tools for a Perfect Result
After Content-Aware Fill has worked its magic, you’ll probably see some soft spots or areas that don't quite match up. Don't worry, that's completely normal. Now it’s time to bring in the Clone Stamp Tool for the detail work.
Zoom right in on the area you just filled. I like to use the Clone Stamp with a soft-edged brush and dial the opacity back a bit. Then, I'll carefully sample textures from right next to the patch and gently paint over any blotchy or repetitive patterns. This two-step process—a quick automated fill followed by careful manual cleanup—gives you the best of both worlds: speed and precision.
Key Takeaway: The goal is to be invisible. A truly great edit doesn't scream, "I was edited!" It just lets the image look natural and clean, as if the distracting text was never there.
The Final Touch Most People Miss
Here's a little trick I’ve used for years to make my edits blend seamlessly: add a tiny bit of noise back in. Sometimes, the repaired area can look too perfect compared to the rest of the image, which might have a bit of natural grain. This subtle difference can give the edit away.
Here’s how to do it:
- Create a new, empty layer right above your repaired layer.
- Go to the menu and select Filter > Noise > Add Noise.
- A little goes a long way. Start with a tiny amount, maybe 1-3%, and make sure the Monochromatic box is checked.
- Now, clip this noise layer to your patch layer by holding Alt (or Option on Mac) and clicking on the line between the two layers.
This simple step applies that subtle grain only to your edited spot, helping it melt perfectly into the texture of the original photograph. It's a game-changer.
Common Questions About Erasing Letters in Photoshop
Even with the best techniques for erasing letters in Photoshop, you’re going to hit a few snags. It’s a rite of passage for every editor. Let's walk through some of the most common hiccups and how to fix them so you can get your project moving again.
Why Does My Content-Aware Fill Look Blurry?
This is easily the most frequent headache. You make your selection, run the Content-Aware Fill, and the result is a soft, smudged mess that looks even more distracting than the original text. Nine times out of ten, it's one of two things.
First, your selection might just be too loose. If you grab a big, wide area around the letters, you're giving Photoshop a lot of confusing information to work with. Try making a much tighter selection that hugs the edges of the text. Using the Lasso Tool or even the Pen Tool for complex shapes gives you the control you need.
The other culprit is a bad sample area. When the Content-Aware Fill workspace pops up, pay close attention to that green overlay showing where Photoshop is borrowing pixels from. If it’s sampling from a weird texture or another object, just paint over those parts of the overlay to exclude them. A little guidance goes a long way.
The old saying holds true: garbage in, garbage out. A clean, precise selection and a well-defined sample area are the keys to a crisp, believable fill.
For a deeper dive into other common editing issues, our team has put together a comprehensive resource. If you're hitting other roadblocks, you can find more solutions on our frequently asked questions page: https://snapcaptionremover.com/faq
How Can I Stop Repetitive Patterns with the Clone Stamp?
Ah, the tell-tale sign of a rushed edit: the repeating pattern. The Clone Stamp is an incredible tool, but it's easy to create an unnatural texture that screams "this was Photoshopped!" The golden rule to avoid this is to constantly change your source point.
Seriously, don't just find one perfect spot and paint from there forever. After just a few brush strokes, hold down Alt/Option and click a new source point nearby. This simple habit is what introduces the natural, random variation that makes an edit completely invisible. Using a soft-edged brush and even lowering the opacity to build up the texture gradually also helps sell the effect.
When you're trying to achieve flawless text removal, the quality of your image matters a lot. For high-resolution material that's easier to edit, checking out the best stock photo sites can give you a clean, professional canvas to start with.
Is It Possible to Remove Text from a Video in Photoshop?
Technically, yes, but it’s a job that will test your patience. Photoshop can handle video, but its features are pretty bare-bones. When you import a video clip, it opens a Timeline panel, and from there, you have to go frame by frame, using tools like the Clone Stamp or Generative Fill on a new layer above the video.
If you have a very short clip—we’re talking just a few seconds—it’s doable. For anything longer, it becomes an incredibly tedious task. For any serious video text removal, you'll be much happier using dedicated software like Adobe After Effects, which is built from the ground up for this kind of motion graphics work.
What Is the Easiest Way to Erase Text on a Solid Color?
If you're lucky enough to be working with text on a simple, flat, solid-colored background, don't overcomplicate it! Forget the fancy AI tools. The fastest and cleanest method is often the most basic one.
- Select the Eyedropper Tool (shortcut: I) and click the background to perfectly match the color.
- Switch to the Brush Tool (shortcut: B).
- Crank the brush hardness up to 100% to avoid soft, fuzzy edges.
- Simply paint right over the text.
That's it. You get a perfect, seamless result in seconds. No fuss, no artifacts.