Remove Writing From Photos Like a Pro: Expert-Tested Methods
Why Photo Text Removal Isn't As Hard As You Think
Imagine: you’ve got this amazing picture, but there’s a pesky logo or some distracting text right in the middle. A few years back, fixing this would’ve meant some serious Photoshop wizardry and a whole lot of patience. Now? Taking writing off photos is way easier than you'd think. Modern tools like SnapCaptionRemover make it surprisingly simple, even if you're a total beginner. I've seen friends wrestle with complicated editing software, only to be amazed by how fast and easy AI-powered tools can be.
This whole shift toward easy photo editing is mainly thanks to Artificial Intelligence (AI). AI algorithms can cleverly analyze your photo, pick out the unwanted text, and remove it cleanly without messing up the background. This means even tricky backgrounds, the kind that used to be an editor's worst nightmare, can be handled pretty easily. Think about removing a watermark from a photo with a busy, patterned background. That used to be a painstaking manual job, but AI can often nail it in seconds.
It’s interesting to see how the demand for easy photo editing is actually creating a booming market. The global AI image enhancer market, which includes tools like those for removing writing from photos, is predicted to jump from $2.11 billion in 2024 to $2.45 billion in 2025. This growth is fueled by better AI tech that allows for more precise and efficient editing. Want to learn more about this trend? Check out this article: AI Image Enhancers in 2025: Latest Tools, Market Trends, Why They Matter. This also means we’re seeing more and more user-friendly tools popping up, making photo editing accessible to pretty much everyone. For a deeper look at removing writing from pictures, take a look at our guide: How to Remove Writing From a Picture.
Finding Your Perfect Photo Editing Match
Let's be honest, not all photo editing tools are born equal. Choosing the wrong one can turn a quick edit into a total nightmare. I've been down that road, trust me. I’ve spent hours testing everything from free online tools to Photoshop, and the difference between what they say they do and what they actually do is astounding.
Some tools are fantastic for wiping out simple text like those pesky Snapchat captions, but completely fall apart when you try to remove anything more complicated. Watermarks, for instance, can be a real headache, particularly if the background is busy. I've personally had a lot of success using AI-powered tools like SnapCaptionRemover for quickly cleaning up captioned Snapchat memories. It’s surprisingly good at handling complex backgrounds and doesn't leave that blurry mess that some other tools do.
But even with the magic of AI, sometimes the good old-fashioned methods are still the best. When I need to do really intricate edits, I often find that combining AI with more traditional editing techniques in something like GIMP gives me the most control and the best results. This is especially true for detailed photos where you don't want to lose any of the finer points. It really boils down to using the right tool for the job.
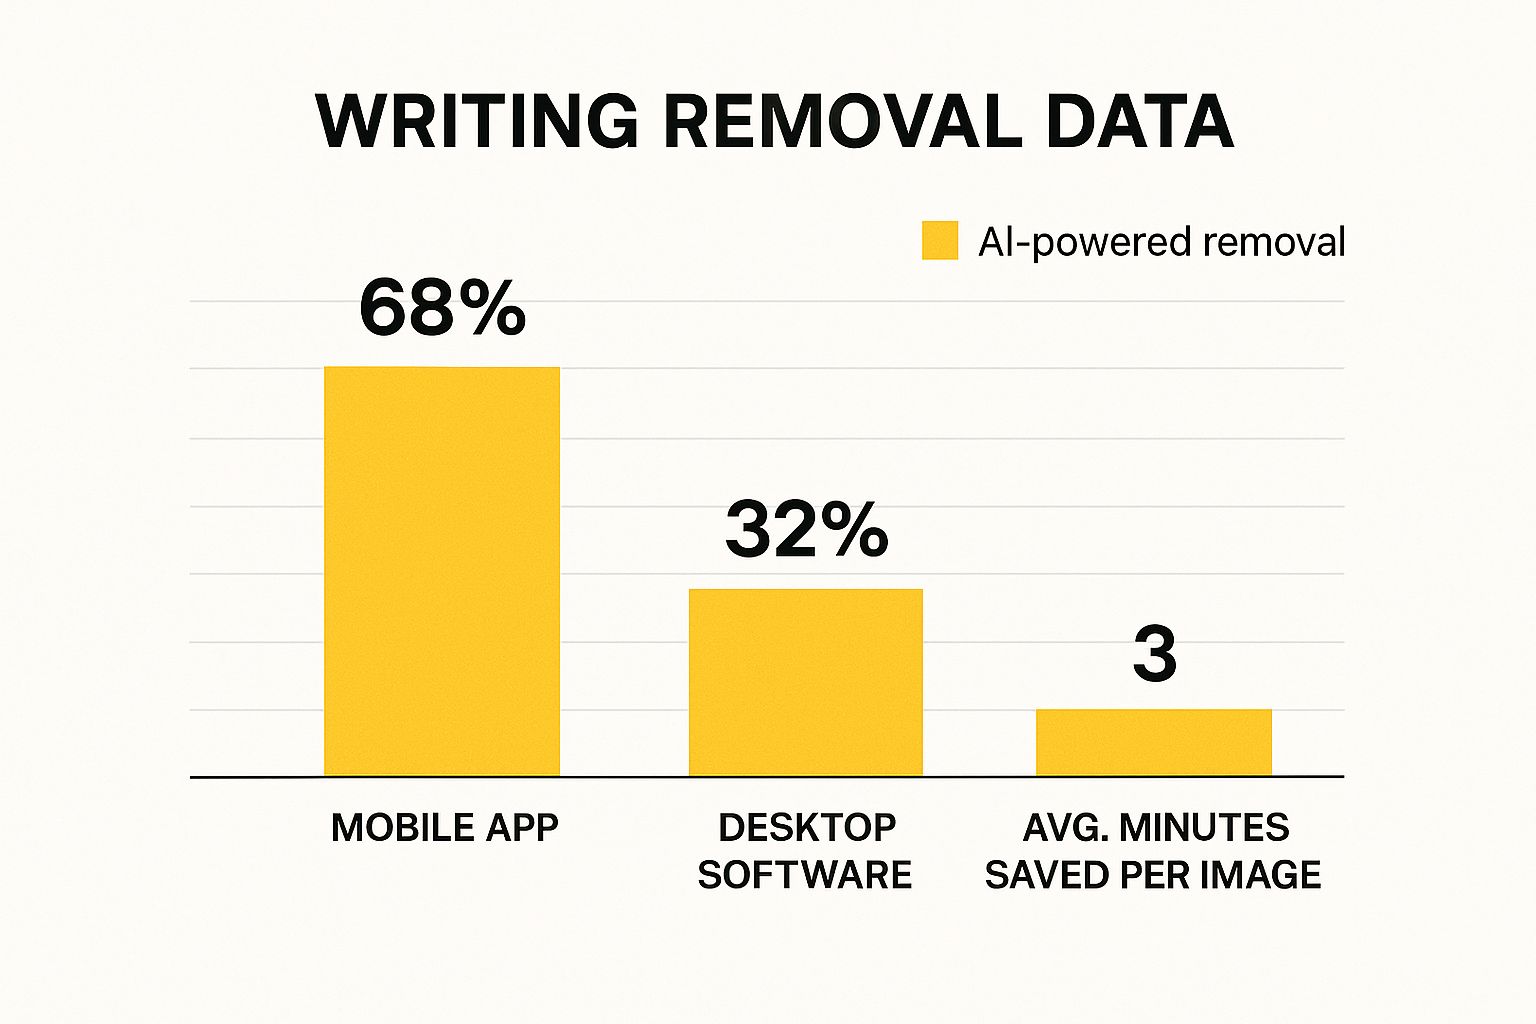
This infographic shows how many people are using mobile versus desktop apps for removing writing from photos, and it also highlights how much time AI-powered tools can save you. You can see how mobile editing is getting more and more popular, and how AI can seriously speed up the process. Time is precious, right? Later on, I’ll give you some practical tips on how to check out new tools and avoid the ones that make big promises but deliver very little.
Finding the right photo editing tool isn’t one-size-fits-all. It’s about understanding what you need and picking the tool that gets it done right. To help you out, I've put together a comparison table of some popular tools.
Photo Editing Tools Comparison
A quick look at the features, pricing, and best use cases of a few popular tools to help you pick the best match for your photo editing needs.
| Tool Name | Price | AI-Powered | Ease of Use | Best For |
|---|---|---|---|---|
| SnapCaptionRemover | Free/Paid | Yes | Easy | Snapchat Captions |
| Photoshop | Paid | Yes | Advanced | Professional Editing |
| GIMP | Free | No | Intermediate | Detailed Edits |
| Online Inpaint Tools (Various) | Free/Paid | Varies | Varies | Simple Overlays |
So, as you can see, each tool brings something different to the table. While SnapCaptionRemover excels at quickly removing captions, Photoshop offers powerful features for complex edits, but comes with a price tag. GIMP is a great free alternative for detailed work, and online inpaint tools can be handy for simple fixes. Choosing the right one will depend on your specific project and skill level.
Setting Up Your Photos for Success

Here’s a pro tip: prepping your photos before you try to remove any text is crucial. It’s the secret to making your edits look professional, not just patched up. Think of it like prepping a wall before painting—you wouldn’t just slap on a new coat without cleaning and priming the surface, would you?
Take a moment to analyze your photo. Is the text you want to remove on a simple background or a busy one? A plain background makes the job so much easier. Busy patterns or detailed textures can make removing text a real headache. Knowing this beforehand helps you avoid frustration and choose the right approach. Sometimes, a simple crop is all you need!
File format and resolution are also super important. A high-resolution image, especially in a lossless format like .PNG, gives you way more flexibility when editing. Resolution is basically the detail level of your photo—the higher the res, the more detail, and the better the final result. A low-res .JPG can get pixelated or blurry, especially when you're removing big chunks of text.
Finally, if you're working with a bunch of photos, get organized! Create a dedicated folder and back up your originals. I learned this the hard way—once I accidentally saved over a precious photo. Believe me, that's a panic you don’t want to experience. Backing up your photos lets you experiment without the fear of losing anything important. These early steps might seem minor, but trust me, they make the whole editing process smoother and more efficient. You'll end up with cleaner, more professional-looking results.
Mastering Text Removal Techniques That Actually Work
Let's talk about getting rid of unwanted text in your photos. It’s not just about the how, but the why behind the techniques. Trust me, understanding the strategy makes a world of difference. You'll be able to adapt to any image or software.
The background makes all the difference. A plain, solid color? Piece of cake. But a busy pattern or a textured image, like leaves? That requires a bit more finesse. A tool like SnapCaptionRemover often lets you just select the text and let the AI work its magic. But sometimes, you'll need more control.
For trickier backgrounds, the clone stamp or healing brush in GIMP or Photoshop are your best friends. Think of them like borrowing pixels from one spot and seamlessly blending them onto another, perfectly hiding the unwanted text. Want a deeper dive? Check out our guide on photo text remove.
Color matching is essential. You don't want to just cover the text; you want to make it disappear like it was never there. Imagine a digital artist meticulously blending colors on a portrait – that’s the level of detail we're aiming for. The AI market for image editing is booming—it jumped from $80 billion in value to about $279 billion in 2023. Check out these AI image statistics! All this growth means better automatic tools for cleaning up blemishes and unwanted marks, which makes our lives so much easier.
Shadows and reflections are the real challenge. Shadows need a delicate touch and subtle blending. Reflections? Sometimes the same tools that remove the text work, but you might have to tweak the opacity or blending mode for a natural result. I’ve run into photos where text is right on top of crucial parts of the image, like someone's face. That’s when you zoom in and work pixel by pixel to avoid distorting the image underneath. Precision is key.
Tackling Complex Photo Challenges Like a Pro
So you’ve got the basics of removing text from photos down pat. Great! But what about those trickier situations? What if the text is splashed across a mug, all curved and distorted? Or maybe it's on a reflective surface, throwing back the whole world? These are the kinds of headaches that can make even experienced editors wince.
Let's say you're trying to remove a logo from a gleaming, brand-new car. The reflections make it a mess, almost impossible to select cleanly with your usual tools. Suddenly, understanding light and reflections becomes your new best friend. Curved surfaces? Similar story. You’ll likely need some warping and perspective adjustments to get a natural look. It's doable, but you need to think outside the box.
Handling Tricky Backgrounds
Busy backgrounds and overlapping elements add another layer of complexity. Imagine trying to remove text from a photo of a beautiful, patterned tapestry. You need serious precision to avoid ruining the design. This is where tools like SnapCaptionRemover become lifesavers. Their AI algorithms are pretty good at figuring out the difference between the text and the pattern underneath it.
I’ve put together a little table to help you quickly assess the difficulty of different text-removal scenarios. It's based on my own experience wrestling with these kinds of edits:
Text Removal Difficulty Assessment A guide to assessing the complexity of removing writing from photos based on various factors
| Background Type | Difficulty Level | Recommended Approach | Success Rate (Estimated) |
|---|---|---|---|
| Plain, solid color | Easy | Standard removal tools | 95% |
| Slightly textured (e.g., wood, concrete) | Medium | Standard tools, possibly some cloning/healing | 85% |
| Busy pattern (e.g., floral, geometric) | Hard | AI-powered tools, manual refinement | 70% |
| Reflective surface (e.g., glass, metal) | Hard | Content-aware fill, cloning, potentially professional retouching | 60% |
| Curved surface (e.g., mug, clothing) | Medium-Hard | Warping, perspective tools, manual blending | 75% |
As you can see, the more complex the background, the more likely you'll need specialized tools and techniques. Don't be afraid to experiment, but also know your limits!
The Growing Demand for Photo Editing
It's interesting to see how the demand for these advanced editing skills is growing. The photographic services market (which includes things like text removal) is expected to be worth a whopping $37.96 billion in 2025 and jump to $64.68 billion by 2034. Precedence Research has more details on this. AI is a huge driver of this growth, automating a lot of the heavy lifting. This means more tools and resources for us to tackle tricky edits.
Knowing When to Call in the Pros
But even the best tools have their limits. Knowing when to get professional help is a key part of being a good editor. If you’re staring down a truly monstrous edit, a professional retoucher might be the best route to a perfect result. Sometimes, it’s just smarter (and less time-consuming) to let the experts handle it.
Building Your Photo Editing Workflow for Long-Term Success
So, you’ve got the hang of the editing techniques and explored the tools. Now, let’s talk about creating a photo editing workflow that’s not only efficient but also grows with your skills. Think of it like a well-organized toolbox: you begin with the basics and add specialized tools as your projects get more complex.
This means starting simple. Removing text from photos with clean backgrounds is a perfect starting point. As you get comfortable, challenge yourself with busier backgrounds or tricky lighting. This gradual approach helps build confidence and lets you develop a keen eye for detail. For instance, after cleaning up captions from a bunch of old Snapchat memories, you might be ready to tackle a watermark on a product photo.
This Canva screenshot shows all sorts of design templates. Notice how clean and organized the interface is? This highlights the importance of a streamlined workspace for any creative process, photo editing included. Keeping your tools and resources organized, whether they’re physical or digital, really does affect your efficiency.
A consistent workflow also saves time and reduces frustration. This could mean organizing your photos into folders, backing up originals, and establishing a step-by-step editing process. Something I've found super helpful is consistently using the same file naming conventions. It’s a game-changer when dealing with tons of images. You might even find this helpful: Remove Text From Image Free.
Establishing Your Quality Standards
As you progress, you’ll develop your own quality standards. This means knowing what's “good enough” for your specific needs. Are you going for pixel-perfect results or is a quick fix all you need? Your standards will naturally evolve as you gain more experience and understand what your tools can do.
This also affects your tool choices. A free online tool might be fine for quick edits, but investing in a premium tool like SnapCaptionRemover makes sense when quality and consistency are crucial, particularly for professional or commercial work.
By establishing a solid foundation and constantly refining your process, you’ll create a photo editing workflow that’s efficient, effective, and adaptable to any challenge. Want to give those Snapchat memories a new life? Try SnapCaptionRemover and see the difference! Get started with SnapCaptionRemover now!