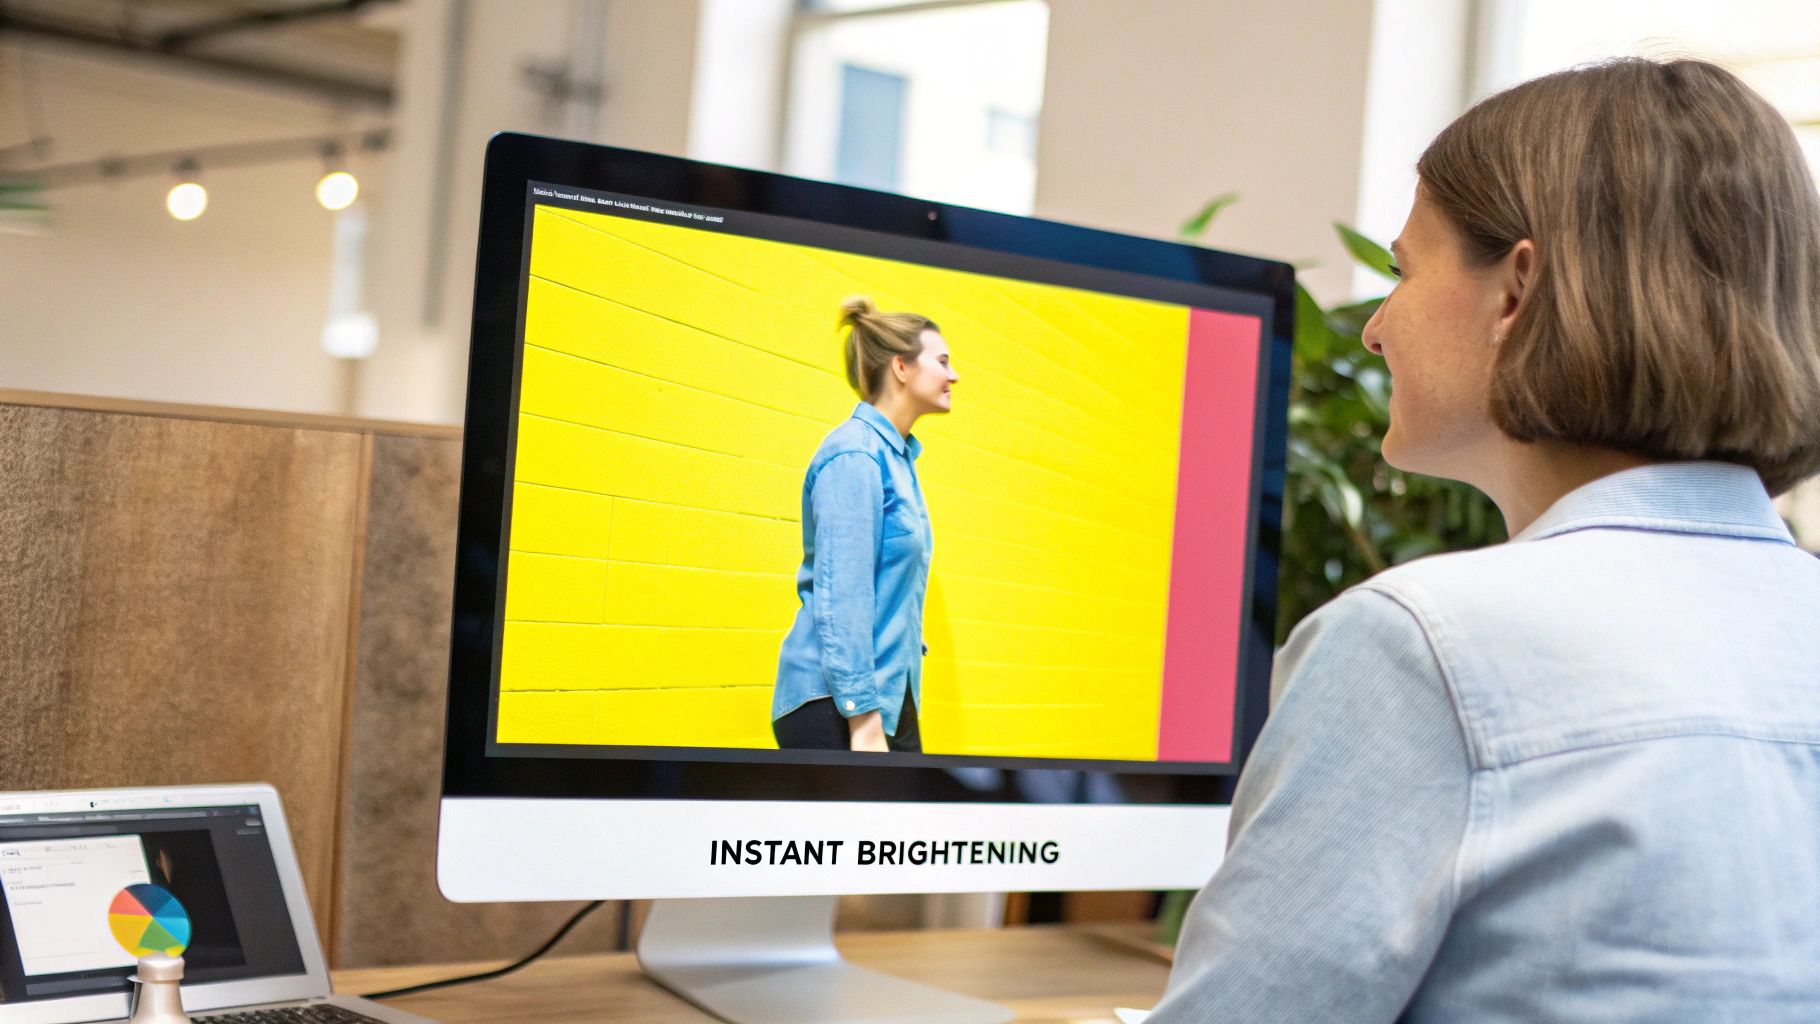
Online Image Brightener: Brighten Dark Photos Instantly
Why Your Photos Need More Than Just Basic Brightness
We’ve all been there. You snap a photo, it looks amazing on your phone screen, and then… disappointment sets in when you see it later on your computer. It’s dull, lifeless, and not at all what you remember. The knee-jerk reaction? Crank that brightness slider up! But trust me, I've learned from experience – and from countless conversations with photographers and content creators – that truly brightening an image is way more nuanced than that. It's not about fixing dark photos; it’s about unlocking their full potential.
One of the biggest things I've picked up is that dullness isn’t usually a single issue. It’s often a cocktail of tricky lighting conditions, slightly off camera settings, and even the way different screens display colors. A simple brightness boost just can’t tackle that complexity. Imagine a dimly lit portrait, for example. You want to brighten the faces, sure, but you also want to keep the atmospheric background. That’s where a good online image brightener comes into play.
Another aspect is the sheer volume of digital images we’re all dealing with these days. Whether it’s for your portfolio, social media feed, or marketing materials, images need to stand out. Understanding how to brighten images intelligently is essential. If you want to dive deeper into boosting image quality, you might find this helpful: improving your photo quality online. This need for top-notch visuals is driving a huge demand for image editing tools. The market for photo editing software is booming, expected to reach USD 345.2 million by 2025, growing at a 5.2% CAGR. That speaks volumes about how crucial visual content has become across all platforms. For a deeper dive into these trends, check out this resource: Discover more insights into photo editing statistics.
Here's a pro-tip I've learned to love: pre-processing. Before you even think about brightening, consider using a tool like SnapCaptionRemover to clean up any unwanted text overlays or watermarks (especially helpful for Snapchat images). Starting with a clean slate makes a world of difference in getting a professional-looking result.
Finally, consider the mood you’re going for. Do you want a bright, airy image, or something more moody and dramatic? Knowing your desired outcome will guide your brightening choices and help you avoid that over-processed, artificial look. Remember, the goal is enhancement, not alteration. Let your images shine authentically and capture the true essence of the moment.
Finding Your Perfect Online Image Brightener Match
Let's be honest, not all online image brighteners are the same. Picking the wrong one can waste your time, or even worse, make your photos look, well, bad. I’ve messed around with a ton of these tools, and trust me, there's a world of difference between a simple brightness boost and a real image enhancement. You’ll find everything from basic one-click tools (fine for a quick social media update) to AI-powered platforms that actually analyze and improve your pics.
The real magic isn't a fancy interface; it's the features. Batch processing is a lifesaver if you're working with multiple images. Check for file format support – JPG, PNG, and the like. And the biggest thing? Quality preservation. Brightening shouldn't mean losing detail. In my experience, some tools are great for portraits but mess up landscapes, while others are perfect for product shots. Whether the AI understands your type of image is a game-changer.
The infographic below shows data from user testing on different online image brighteners, looking at average processing time, brightness increase, and how happy people were with the results.
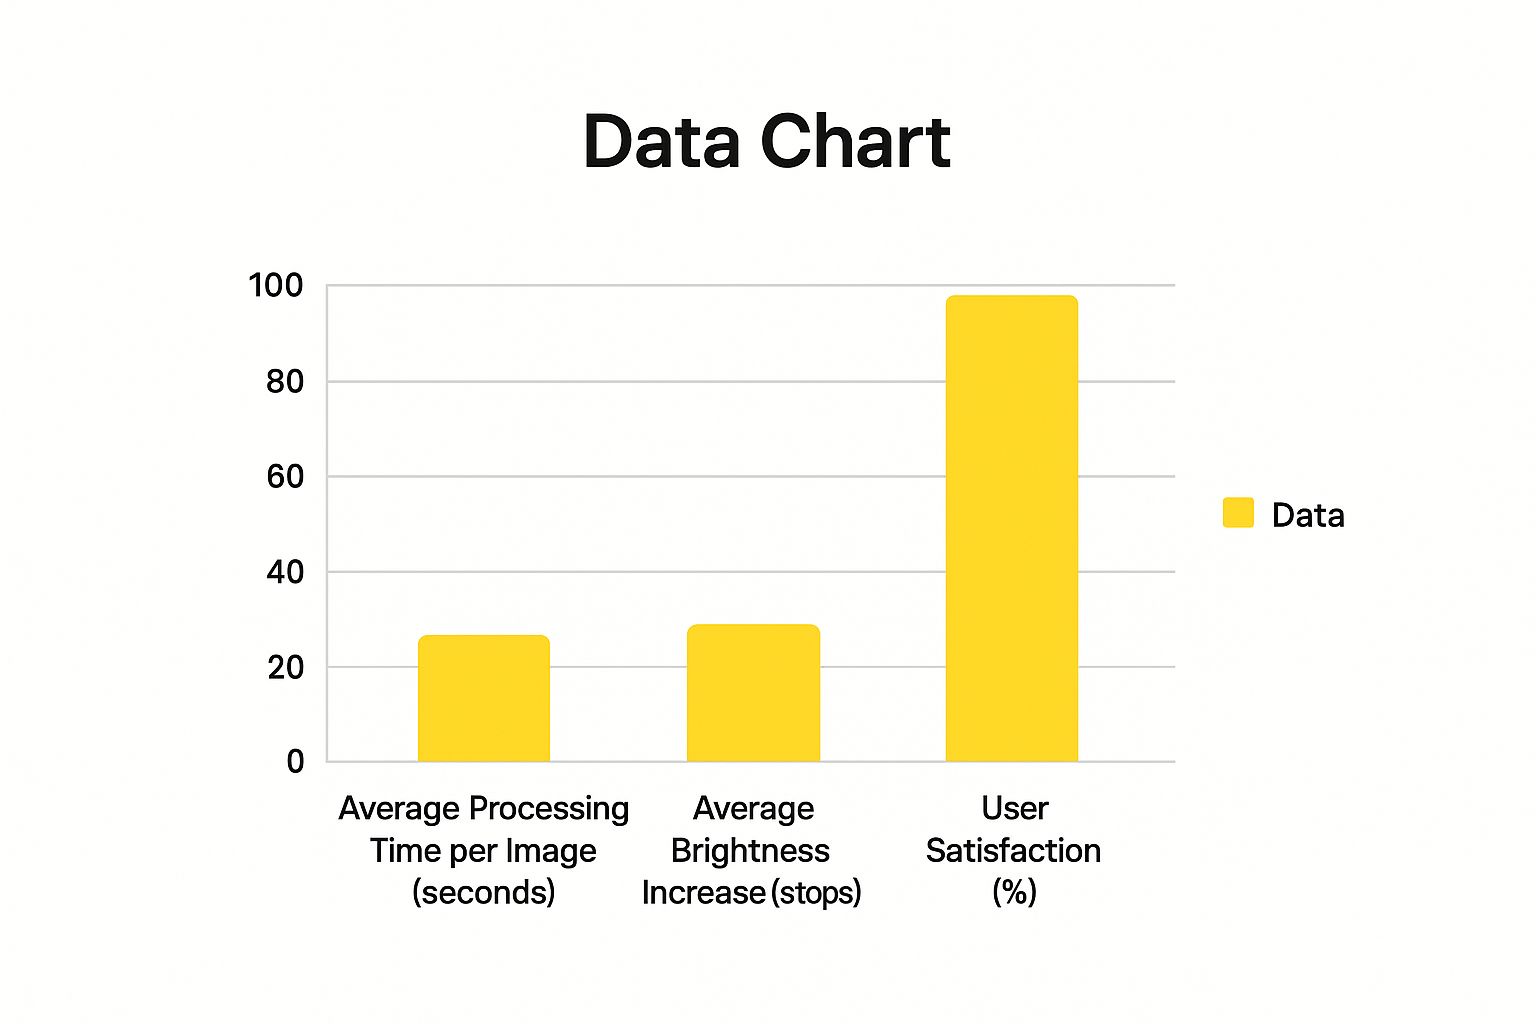
You can see how some tools focus on speed, others on max brightness, and still others on user satisfaction. This is why finding an online image brightener that fits your needs is so important. Got hundreds of product photos? You need speed, batch processing, and decent quality. Perfecting one portrait? Maybe a tool with subtle AI-powered tweaks is better. Ignore the hype – find what actually works for you.
To help with that, I’ve put together a comparison table of some popular online image brighteners. This breaks down some key features that really make a difference.
Online Image Brightener Comparison: Features That Matter
A comprehensive comparison of popular online image brightener tools, highlighting key features, pricing, and best use cases
| Tool Name | AI-Powered | Batch Processing | File Formats | Best For |
|---|---|---|---|---|
| Example Tool 1 | ✅ | ✅ | JPG, PNG | Quick brightening, social media |
| Example Tool 2 | ✅ | ❌ | JPG, PNG, TIFF | Detailed editing, professional photography |
| Example Tool 3 | ❌ | ✅ | JPG, PNG | Bulk image processing, e-commerce product photos |
(Note: This table uses placeholder tool names – I'll be updating this with real tools and specific info soon! Keep an eye out for the updated version.)
So, as you can see from the table (once it's populated with real tools!), there's a tool for every need. Picking the right features will save you time and frustration, leaving you with brighter, better images. Don't forget to experiment!
Creating Your Optimal Editing Environment
Before we even think about brightening an image, let's talk about something often overlooked: your editing setup. I learned this the hard way. After hours tweaking an image, I’d see it on a different screen and… yikes! It looked totally different. Monitor calibration, browser settings, even room lighting can seriously mess with how you perceive brightness and color.
It's like baking, right? Perfect recipe, wrong oven temperature, and you've got a disaster. A poorly calibrated monitor can similarly trick you into overdoing it with the brightening (or not doing enough). Pro editors I know are crazy meticulous about their setups for this very reason.
The Impact of Your Setup
What’s a “good” editing environment, then? It’s all about consistency. Different browsers render colors differently. Chrome might show an image slightly warmer than Firefox, for example. Small differences, sure, but enough to throw your edits off. Even room lighting is a factor. Backlighting is the worst – glare and reduced contrast make it nearly impossible to judge brightness accurately.

Creating Consistency
You don't need a pro studio, just predictable conditions. A neutral gray wall behind your monitor can work wonders for minimizing reflections and color distortions. Tweak your monitor's brightness and contrast until they’re balanced. There are tons of free online tools and apps to help calibrate your screen, too.
These little things create a reliable baseline. Your edits will translate better across devices and platforms. Also, a streamlined workflow helps, especially when juggling multiple images. Sticking with one online image brightener and applying similar adjustments across a batch of photos keeps things cohesive. That way, you know your images will look as intended, no matter where they end up. Remember, good image editing isn't just about the software; it's about the entire editing ecosystem.
The Art of Intelligent Image Brightening
So, you've got your online image brightener picked out and your editing environment all set. Now for the fun part! This is where we go beyond simply sliding things around and start thinking about how to make an image really shine. The secret? Don't think of brightness as one isolated adjustment. Think of it as a relationship between brightness, contrast, and saturation. They’re all interconnected.
I’ve watched pro photo editors rescue truly terrible, dark photos. Not just by cranking up the brightness, but by carefully examining the image. They use the histogram, a visual guide to the tonal range. It shows the distribution of dark, mid-tone, and bright pixels.
This histogram shows a pretty balanced image, with tones nicely spread across the spectrum. A histogram piled up on the left means underexposure, while a pile on the right signals overexposure. This information is crucial for targeted adjustments. Think of it like a map of your image's soul. It shows you where the problems (and potential) are. You might find our guide on free photo enhancers helpful: Check out our guide on photo enhancement!
Let’s talk real-world scenarios. Backlit portraits are a classic example. The background looks gorgeous, but the face is swallowed by shadows. An online image brightener, especially one with AI, can intelligently lift those shadows without blowing out the background. Same with underexposed landscapes – there’s so much hidden detail just waiting to be uncovered! Product photos also benefit hugely. True colors really pop when the brightness is dialed in.
Speaking of which, with photo editing and AI becoming so intertwined, online image brighteners are becoming smarter and more automated. In fact, the global AI market hit USD 279 billion in 2024, with AI image editing claiming a bigger piece of the pie every year. Discover more insights about AI in image editing.
AI is powerful, sure, but it's not magic. Knowing how to guide those AI suggestions is where true control comes in. You become the artist, using the tools to express your vision. That’s the difference between a decent result and a stunning one. We’ll dive into specific techniques for this artistic approach in the next section.
Professional Techniques That Elevate Your Results

Want to take your images from "meh" to "wow"? Let's ditch the basic brightening and dive into some pro techniques. One of my favorites is selective brightening. Instead of blasting the entire image with light, focus on what matters. Think about a portrait with a gorgeous sunset backdrop. You want the person's face to be clear, but you also want those vibrant sunset colors. Selective brightening lets you have both—illuminating the subject without washing out the background.
This brings us to dynamic range, which is the span of tones in your image, from the deepest shadows to the brightest highlights. The trick is keeping detail in both. Trust me, pros rarely make one massive adjustment. Instead, we prefer layering subtle changes. It’s more controlled and avoids nasty side effects like noise (grainy splotches in shadows) or blown-out highlights (those overly bright, detail-less areas). It's like carefully seasoning a dish - a pinch of this, a dash of that.
Another thing to consider is how brightness interacts with other adjustments. Sometimes, the answer isn't more brightness at all. Maybe it's a tweak to the contrast or saturation. Bumping up the contrast can make an image look brighter by accentuating the difference between light and dark. Similarly, richer saturation can make the colors pop, giving an indirect brightness boost. You might even want to look into further enhancing your pictures. These techniques are a bit more nuanced but produce images that look polished and natural, not over-edited.
Let's talk about a few different approaches and when to use them. I've put together a table to break it down:
Brightness Adjustment Techniques: When To Use Each Method
This table summarizes different brightening techniques, when they're most useful, and the potential advantages and disadvantages.
| Technique | Best Used For | Pros | Cons | Skill Level |
|---|---|---|---|---|
| Basic Brightness Adjustment | Quick fixes, slightly underexposed images | Fast, simple | Can wash out colors, lose detail | Beginner |
| Selective Brightening | Portraits, images with varying light levels | Precise control, maintains dynamic range | Time-consuming | Intermediate |
| Contrast Adjustment | Images lacking depth, subtle brightening | Adds "pop," enhances details | Can exacerbate noise or clipping | Intermediate |
| Saturation Adjustment | Images with dull colors, indirect brightening | Enhances vibrancy, creates a brighter impression | Can look unnatural if overdone | Intermediate |
| Shadow/Highlight Recovery | Images with very dark shadows or bright highlights | Recovers lost detail | Can introduce artifacts if pushed too far | Advanced |
As you can see, each technique has its strengths and weaknesses. Choosing the right one depends on your image and what you're trying to achieve.
From my experience, brightening is just one piece of the puzzle. Sometimes, I use SnapCaptionRemover to remove distracting text before I even start brightening. Other times, it’s about subtle contrast tweaks to create the illusion of brightness. It’s this interconnected approach that really makes a difference. By understanding how these elements work together, you can unlock the full potential of your photos.
Avoiding The Mistakes That Ruin Great Photos
Let's talk about brightening images online. Even with the best tools and techniques, it's surprisingly easy to mess things up. I've seen it happen firsthand—talented photographers making simple brightness adjustments that completely wreck a photo. Over-processing is the biggest culprit. That fake, overly edited look is a surefire way to turn viewers off. Knowing the warning signs of poor brightening will save you from this fate and help you develop a good eye for quality.
I remember once, I was working on a landscape shot. I thought cranking the brightness would magically reveal hidden details in the shadows. Nope. It just washed out the entire image, making it look flat and lifeless. The details were there, but the overall mood and impact were gone. That taught me a valuable lesson: subtlety is key. Small, incremental changes are almost always preferable to one big, drastic adjustment.
The technical stuff matters too. Understanding how different file formats, like JPGs and PNGs, handle brightness changes is important, especially when it comes to compression artifacts. And don't forget about resolution. Enlarging an image then brightening it can lead to pixelation and blurriness. Preserve your original files! Trust me, it's a lifesaver when an experiment goes wrong.
This all ties into the booming market for image enhancement tools, including online image brighteners. With the constant demand for high-quality visuals, from social media to e-commerce, innovation in this area is exploding. Want to learn more? Check out the latest image enhancement market trends.
But the most important skill? Knowing when to stop editing. Finding that sweet spot where your image looks its best without being overdone takes practice. The goal isn't to create a hyper-real, artificial image. It's about enhancing the natural beauty of the photo, as if it were perfectly lit from the start. That's the art of using an online image brightener effectively.
Your Roadmap To Consistently Brighter Images
So, you've got a handle on the tricks and techniques for brightening images. Great! Now, let's talk about actually putting that knowledge to work. You're not going to become a master overnight, but you can build up your skills progressively. My advice? Start simple and add more advanced techniques as your eye gets better.
For example, you could begin by getting really comfortable with basic brightness and contrast adjustments in a simple online image brightener. After you’ve got that down, start playing around with things like targeted brightening and shadow recovery. Trust me, easing into it like this helps you build confidence and avoid that overwhelmed feeling. I remember when I was starting out, I tried to do way too much all at once and ended up with photos that looked totally fake. It was by really concentrating on one technique at a time that I started to understand how each little tweak affected the final image.
Building a Workflow That Works For You
Whether you’re touching up one photo or prepping a whole bunch for a presentation, having a structured workflow is essential. Let me give you a couple of examples.
-
Single Image Enhancement: Here's where you can really dive into the details. Tools like selective brightening become your best friend. Imagine you're working on a portrait – you can brighten the face just enough while still keeping the mood of the background. And don’t forget about pre-processing! A tool like SnapCaptionRemover can be a lifesaver for cleaning up things like distracting text overlays before you even start brightening.
-
Batch Processing: Efficiency is key when you're dealing with lots of images. An online image brightener with batch processing is a must. You can make global brightness and contrast adjustments to get a consistent look across the board, and then go back and fine-tune individual pictures if needed. It’s all about balancing speed and quality.
Consistent Practice Makes Perfect
Don't expect to be a pro right off the bat. Becoming skilled at image brightening takes regular practice, just like anything else. Start with reasonable expectations and remember that every time you edit a picture, you’re learning something new. It's like learning an instrument; you wouldn't expect to play a concerto perfectly after your first lesson! It takes time, dedication, and the understanding that you'll make mistakes along the way. The more you experiment with your online image brightener, the better you'll grasp how the different adjustments work together.
As you improve, don't be afraid to check out new tools and resources. The world of online image editing is always changing. Keep learning, keep playing around, and you’ll see your images go from "good enough" to seriously impressive. By the way, if you're working with Snapchat photos, SnapCaptionRemover is a super easy way to clean them up before brightening. Seriously, it's changed the game for me!