Your Guide to Using an AI Text Remover
An AI text remover is a specialized tool that uses artificial intelligence to automatically find and erase unwanted text from your pictures. It intelligently fills in the background where the text used to be, fixing the common headache of a great photo being spoiled by a caption, watermark, or other text overlay.
Why AI Text Removers Are a Game Changer

Ever find the perfect stock photo, only to see it's plastered with a distracting watermark? Or maybe you needed to reuse a great marketing graphic, but the original, text-free version is long gone. These are frustratingly common scenarios for anyone working in marketing, design, or even just managing their personal photos.
Before these AI tools came along, your only option was a painstaking manual edit in a program like Adobe Photoshop. This meant you needed real technical skill, a ton of patience, and a good chunk of time to carefully clone, patch, and heal the area behind the text. Honestly, it just wasn't practical for most people.
The Shift to Instant, Accessible Editing
An AI text remover completely flips the script. Instead of hours of tedious work, you get a clean image in seconds. It’s a similar evolution to what we’ve seen with other tools, like those for AI-powered background removal, which have made professional-level photo editing accessible to everyone, no design degree required.
To really see the difference, let’s look at a quick comparison between the old way and the new way.
Manual vs AI Text Removal at a Glance
| Feature | Manual Removal (e.g., Photoshop) | AI Text Remover |
|---|---|---|
| Speed | Slow; can take minutes to hours | Extremely fast; often just seconds |
| Skill Level | High; requires technical expertise | Low; anyone can use it |
| Result Quality | Varies based on skill; can be perfect or poor | Consistently good, especially on simple backgrounds |
| Cost | Requires expensive software subscriptions | Often free or low-cost subscription models |
| Accessibility | Limited to users with specific software/skills | Web-based and available to anyone |
This table really highlights the massive leap forward. The AI approach isn't just a little better—it fundamentally changes who can perform this task and how quickly.
Think about these real-world situations:
- Marketing Agility: A social media manager needs to update a promo graphic with a new discount. Instead of bugging a designer and waiting, they can remove the old text themselves and pop in the new one in minutes.
- Preserving Memories: You scan an old family photo, but a bright orange digital timestamp or a forgotten Snapchat caption is covering someone's face. An AI tool can restore that picture to its original, clean state.
- Content Creation: A blogger finds a fantastic user-generated photo for their article but needs to remove the Instagram handle to keep the look clean and protect privacy. Done in a click.
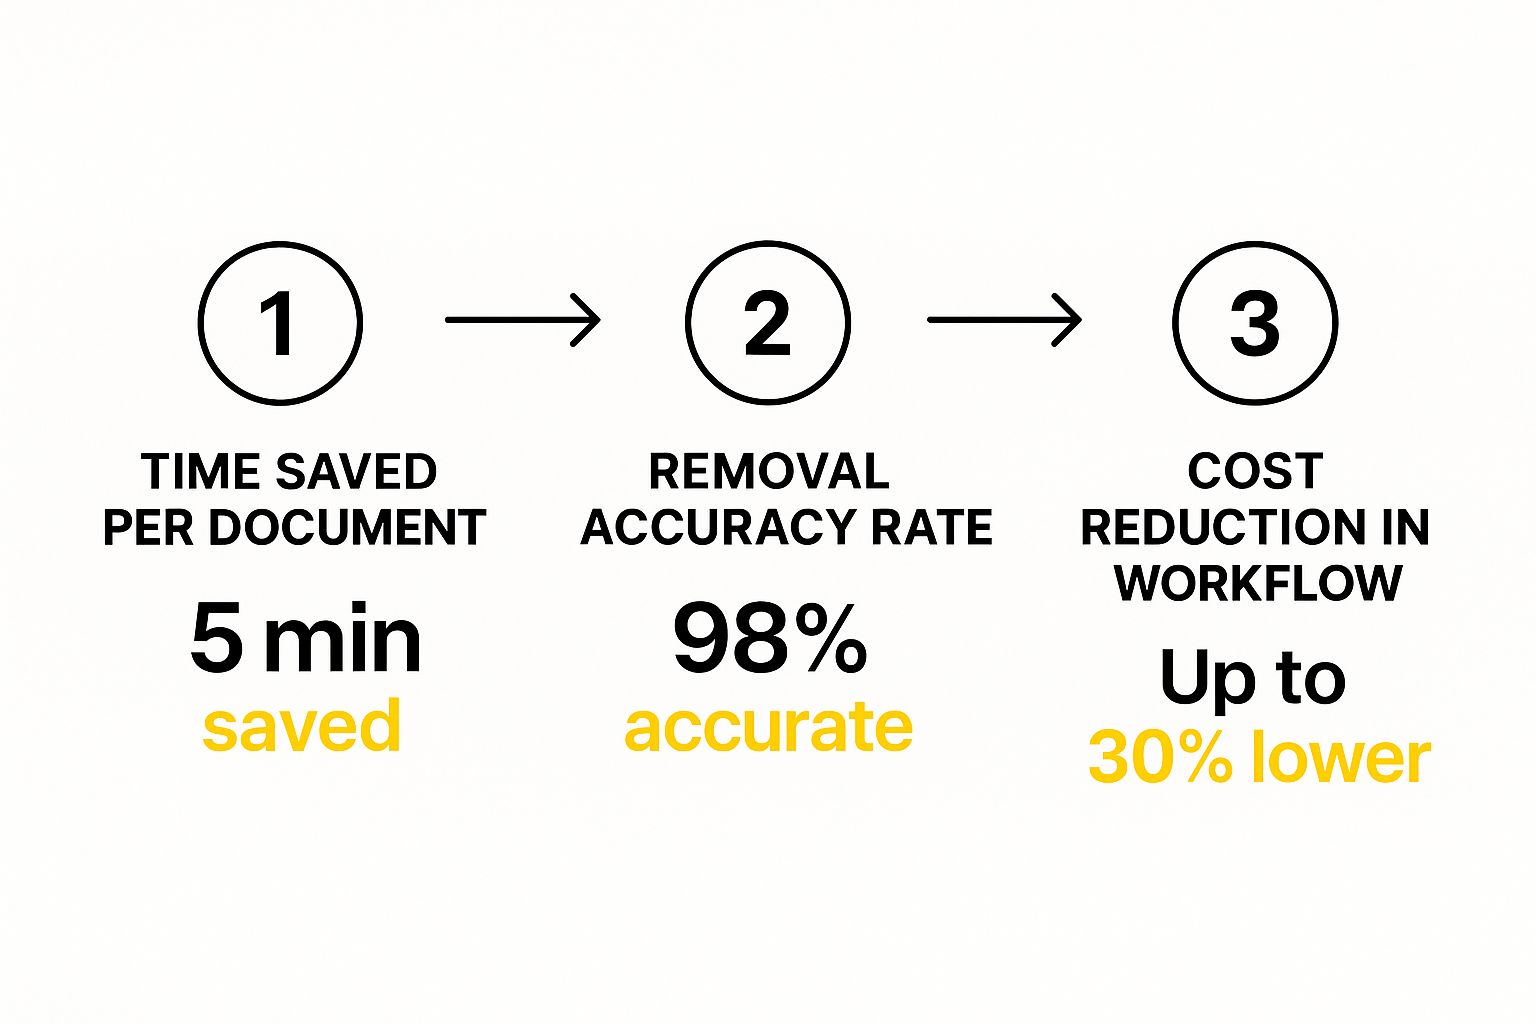
The core benefit here is raw efficiency. A task that once demanded specialized skills and considerable time is now something you can knock out with a few clicks. This frees up creative professionals to focus on strategy and bigger ideas.
This shift is a big deal, and the numbers back it up. The related global AI text generator market was valued at $423.8 million in 2022 and is on track to hit $2.2 billion by 2032. This incredible growth shows just how much demand there is for smart AI tools that help us manage text and images. You can dive deeper into the numbers in the full market research analysis.
How to Prep Your Image for the Best Results
The old saying "garbage in, garbage out" couldn't be more true when working with an AI text remover. The final quality of your edited picture is almost entirely dependent on the quality of the image you start with.
Think of it this way: you're asking the AI to rebuild a part of your image from scratch. A few minutes of prep work can be the difference between a seamless edit and a blotchy, obvious patch.
First things first, let's talk about image resolution. A crisp, high-resolution image gives the AI more data to work with. It has more pixels to analyze and sample from when it reconstructs the area behind the text. If you upload a blurry or pixelated photo, the tool will have a much harder time creating a natural-looking fix.
If your source image is a bit fuzzy, don't give up. Try running it through an AI upscaler first. These tools can sharpen the details and give the text remover a much better canvas to work on. It’s a quick extra step that can really save the final product.
Check the Background and File Type
Before uploading, take a quick look at your image. Where is the text? Is it slapped on a simple, flat background, like a clear sky? Or is it sitting on top of something tricky, like a patterned shirt or a rocky cliff face?
- Simple Backgrounds: Text on a plain or gently blurred background is a cakewalk for the AI. It can easily grab pixels from the surrounding area to fill in the gap.
- Complex Backgrounds: When text covers intricate patterns or a person's face, the AI has to work much harder. The results can still be impressive, but it’s good to know what you’re up against.
Your file format also plays a role. Most images online are JPEGs, which are great for keeping file sizes small. But they use a "lossy" compression, which can create tiny, fuzzy artifacts around text. These little imperfections can throw the AI off. PNG files, however, use "lossless" compression, keeping every single pixel perfectly intact.
My Two Cents: I always try to use a PNG if I can. It just gives the AI cleaner data to work with. If you only have a JPEG, make sure it’s saved at a high-quality setting to minimize any weird artifacts.
Crop the Image to Focus the AI
Here’s one of my favorite tricks for getting better, faster results: crop your image. If the text you want to remove is only in one small part of a huge photo, there’s no need to make the AI analyze the whole thing.
Just crop the image down to the area that needs fixing. This does two brilliant things. First, it makes the process way faster because the tool has less data to chew on. Second, it forces the AI text remover to concentrate all its power on the one spot that actually matters.
Cropping eliminates distractions and points the AI directly at the problem. By taking a moment to check your resolution, consider the background, and crop smartly, you’re setting the stage for a much cleaner and more professional outcome.
A Practical Walkthrough of Removing Text
Alright, with your image prepped and ready to go, it's time for the fun part. Let's get our hands dirty and actually use an AI text remover. I'll be using our tool, SnapCaptionRemover, for this demonstration, but honestly, the basic steps are pretty much the same across most modern removers. The idea is to show you just how simple and creative this process can be.
First things first, you need to get your image into the tool. Most browser-based editors, ours included, have a big, obvious upload box. You can literally just drag your file and drop it onto the page. Or, if you prefer, click the box to open your file explorer and pick the image from there. It's designed to be quick and get you straight into the editor without any fuss.
Selecting the Text for Removal
Once your image loads up in the editor, you'll see a brush or some kind of selection tool. This is your magic wand. Your only job is to paint over the text you want to make disappear.
After doing this hundreds of times, I've picked up a few tricks for getting the cleanest removal:
- Be Generous with the Brush: Don't just meticulously trace the letters. It's actually better to paint over a slightly larger area, creating a small buffer around the words. This gives the AI more information to work with when it rebuilds the background.
- Handle Busy Backgrounds with Care: If your text is sitting on something complex—like a field of grass, a detailed pattern, or a crowd of people—try to be a bit more precise. Keeping your selection tighter to the text helps the AI avoid getting confused by all the background noise.
- Simple Backgrounds Are Easy: Got text on a plain wall or a clear blue sky? You can be much looser with your selection. The AI will have zero trouble figuring out what to fill in.
The real magic behind this is a process called "inpainting." Essentially, the algorithm intelligently analyzes the pixels surrounding your selection and uses them as a blueprint to rebuild what's underneath the text. A good selection is your way of giving the AI a clear map to follow.
This is the same core technology used in professional photo restoration. For instance, look at how inpainting is used to repair a damaged old photograph:
See how it fills in the missing pieces by looking at what's around them? That’s exactly how the tool erases text and seamlessly reconstructs the background.
Finalizing and Downloading Your Image
After you've highlighted the text, just hit the "Remove Text" button (or something similar). This is where the AI takes over. It usually only takes a few seconds to process, and then you'll see the final, text-free image.
If it looks great on the first try, you're all set! Just download the high-resolution, watermark-free version.
But what if you spot a tiny little artifact or an imperfection? No sweat. It happens. You can usually just hit "undo" and try selecting the area again, maybe a little tighter or a little wider this time. For more stubborn cases, you can dive into our guide on how to remove text from an image which covers more advanced touch-up tricks.
With these steps, you should feel totally ready to start cleaning up your own images right away.
Dealing With Tricky Text Removal Jobs
While an ai text remover is great for text on simple backgrounds, what happens when you’re up against a real challenge? I’m talking about text plastered over someone’s face, a detailed pattern on clothing, or a super busy background. These are the moments where a little extra finesse makes all the difference.
If your first attempt doesn't look perfect, don't get frustrated. For these tough jobs, you need to stop thinking of it as a single click and start approaching it like a digital artist would—using careful, deliberate steps to guide the AI toward a clean result.
Try the Multi-Pass Technique
Instead of highlighting a whole sentence at once, try what I call the "multi-pass" approach. It's simple: remove the text in smaller, more manageable chunks.
Imagine you're trying to erase a pencil mark on a delicate drawing. You wouldn't just scrub the whole area aggressively, right? You'd work on small sections, bit by bit. The same idea applies here.
- Go for the easy wins first. Start by removing smaller words or phrases that sit on simpler parts of the background.
- Zoom in and isolate. If a few letters are sitting on a really tricky spot, like the edge of a person's eye or a complex texture, erase them individually.
- Work from the outside in. By clearing the easiest parts of the text first, you give the AI more clean background to sample from when it tackles the tougher areas in the middle.
This method almost always gives you a cleaner result. You're basically breaking down one huge, complex problem into a series of smaller, simpler ones that the AI can solve more accurately. Each successful pass builds a better foundation for the next one.
My Pro Tip: The multi-pass approach is your secret weapon for complex images. By breaking the task into smaller pieces, you stay in control and prevent the AI from getting overwhelmed by too much conflicting visual information at once.
Fine-Tuning with a Little Post-Editing
Even the best ai text remover can leave behind tiny imperfections on those really difficult images. You might notice a slightly blurry patch or a faint ghost of where the text used to be. The good news? You don't need expensive software to clean it up.
Most free, browser-based photo editors like Photopea or Pixlr have exactly what you need for a quick touch-up.
- The Blur Tool: Grab a small, soft-edged blur tool and gently tap on any sharp or pixelated edges left behind. This is my go-to for blending the AI-generated patch seamlessly into the rest of the image.
- The Clone/Heal Tool: This is a lifesaver for fixing small, mismatched patterns. You can sample a tiny piece of the correct background texture from right next to the flaw and just "paint" over the imperfection.
With these two simple tools, you can take a good AI removal and make it perfect in less than a minute. It’s that final polish that makes your edit completely invisible.
This digital-first approach to editing has become standard as the AI market continues to grow. By 2024, the global AI market had already surpassed $184 billion, and forecasts predict it could rocket past $826 billion by 2030. You can see more on the growth of the AI market at Statista.com for a deeper dive into the numbers.
Avoiding Common AI Text Removal Mistakes
Using an AI text remover can feel like a bit of magic, but sometimes the spell doesn't quite work as expected. You might see a faint ghost of the letters, a slightly blurry patch where the text used to be, or other strange artifacts, especially when the AI has to deal with a weird font.
Don't worry, these issues are incredibly common and almost always fixable with a few simple tweaks. Think of it like a recipe. If your cake comes out a little dry, you don't throw away the recipe; you just adjust the baking time or add a bit more liquid next time. The same idea applies here. These common hiccups are just learning opportunities that will quickly make you a pro at getting clean, professional results every time.
The Problem of Blurry Patches
One of the most frequent complaints I hear is about getting a soft, out-of-focus spot where the text was. This almost always happens for one key reason: your selection area was too large and imprecise, particularly on a detailed or complex background.
When you highlight a big chunk of a complex pattern—like grass, wood grain, or a patterned shirt—you're forcing the AI to guess what that entire area should look like. It essentially averages out the surrounding pixels, which is what creates that tell-tale blur.
The fix is surprisingly simple: be more deliberate with your selection.
- Zoom In: Get right up close to the text so you can see exactly what you’re doing.
- Use a Smaller Brush: A smaller brush size gives you much more control.
- Trace the Text: Instead of painting a big, blocky rectangle, try to trace the general shape of the words.
This approach gives the AI much clearer instructions, helping it rebuild the background with sharp, accurate details instead of a fuzzy guess.
By refining your selection, you’re not just erasing text; you're guiding the AI to perform a more precise digital reconstruction. This small change in technique often makes the biggest difference in the final quality of the image.
Faint Text Ghosts or Remnants
Ever removed text only to see a faint "ghost" of it left behind? This is another classic issue. It often happens when the text color is very close to the background color, or when the letters have a soft drop shadow or glow effect. The AI nails the main text but misses these subtle additions.
The solution here is usually a two-step process. First, run the removal as you normally would. If a ghost remains, don't hit undo. Just highlight that faint remnant again and run the process a second time. This follow-up pass is usually all it takes to clean it up completely.
If you’re still having trouble after a second pass, our detailed guide on how to remove text from a photo covers more advanced strategies for these particularly tricky cases.
Once you know what to look for, you can anticipate these common pitfalls and move from being a casual user to someone who can confidently clean up any image. It’s all about understanding what the tool needs to do its job well and adjusting your approach to help it succeed.
Got Questions About AI Text Removers? Let's Talk.
As you start using tools like this, some questions naturally come up. I've heard them all over the years, so let's walk through the most common ones. Getting these answers straight will help you use any AI text remover like a pro.
Can an AI Actually Replace the Text?
This is a great question. Most of these tools are built for one thing and one thing only: removal. They’re fantastic at erasing text and then cleverly rebuilding the background behind it—a technique we call inpainting.
What they don't usually do is let you type in new text. For that part of the job, your best bet is to download the cleaned-up image first. Then, you can pop it into a separate photo editor or a user-friendly tool like Canva to add whatever new headlines or graphics you need.
What Types of Images Give the Best Results?
From my experience, an AI text remover does its best work on high-quality images where the text isn't covering up something super complicated. A caption laid over a simple blue sky or a plain wall? That’s the ideal scenario. The AI can easily figure out what the background should look like.
Where you might see some hiccups:
- Busy patterns: Think intricate floral prints or detailed brickwork. Recreating these perfectly can be tricky for the AI.
- Delicate features: If text is covering a person's eye or strands of hair, the reconstruction can sometimes look a little off.
- Low-resolution photos: Blurry or pixelated images just don't give the AI enough information to produce a clean result.
My takeaway: The quality of your starting image directly impacts your final result. Give the AI a sharp, clear photo, and you'll get a much more convincing and seamless edit in return.
Is It Okay to Remove Watermarks?
This is the big one, and it touches on some important legal and ethical lines. The technology can absolutely erase a watermark, but just because you can doesn't mean you should.
Removing a watermark from an image you don't own is almost always a violation of copyright law. It's just not a good practice. The responsible way to use these tools is on photos you have the rights to—like your own photography or brand assets you’ve created. Respecting intellectual property is key. If you want to dive deeper into our usage policies, you can find more details on our FAQ page.
It's no surprise these tools are popping up everywhere. The broader AI market is exploding. In 2024, it was already valued at a massive $638.23 billion. And according to Precedence Research, it's projected to climb to an incredible $3.68 trillion by 2034. This just shows how deeply these smart technologies are being woven into our everyday work.
Ready to see it in action on your own photos? Give SnapCaptionRemover a spin and watch how quickly it erases unwanted text. You can start for free right now at https://www.snapcaptionremover.com.